Adding a new product
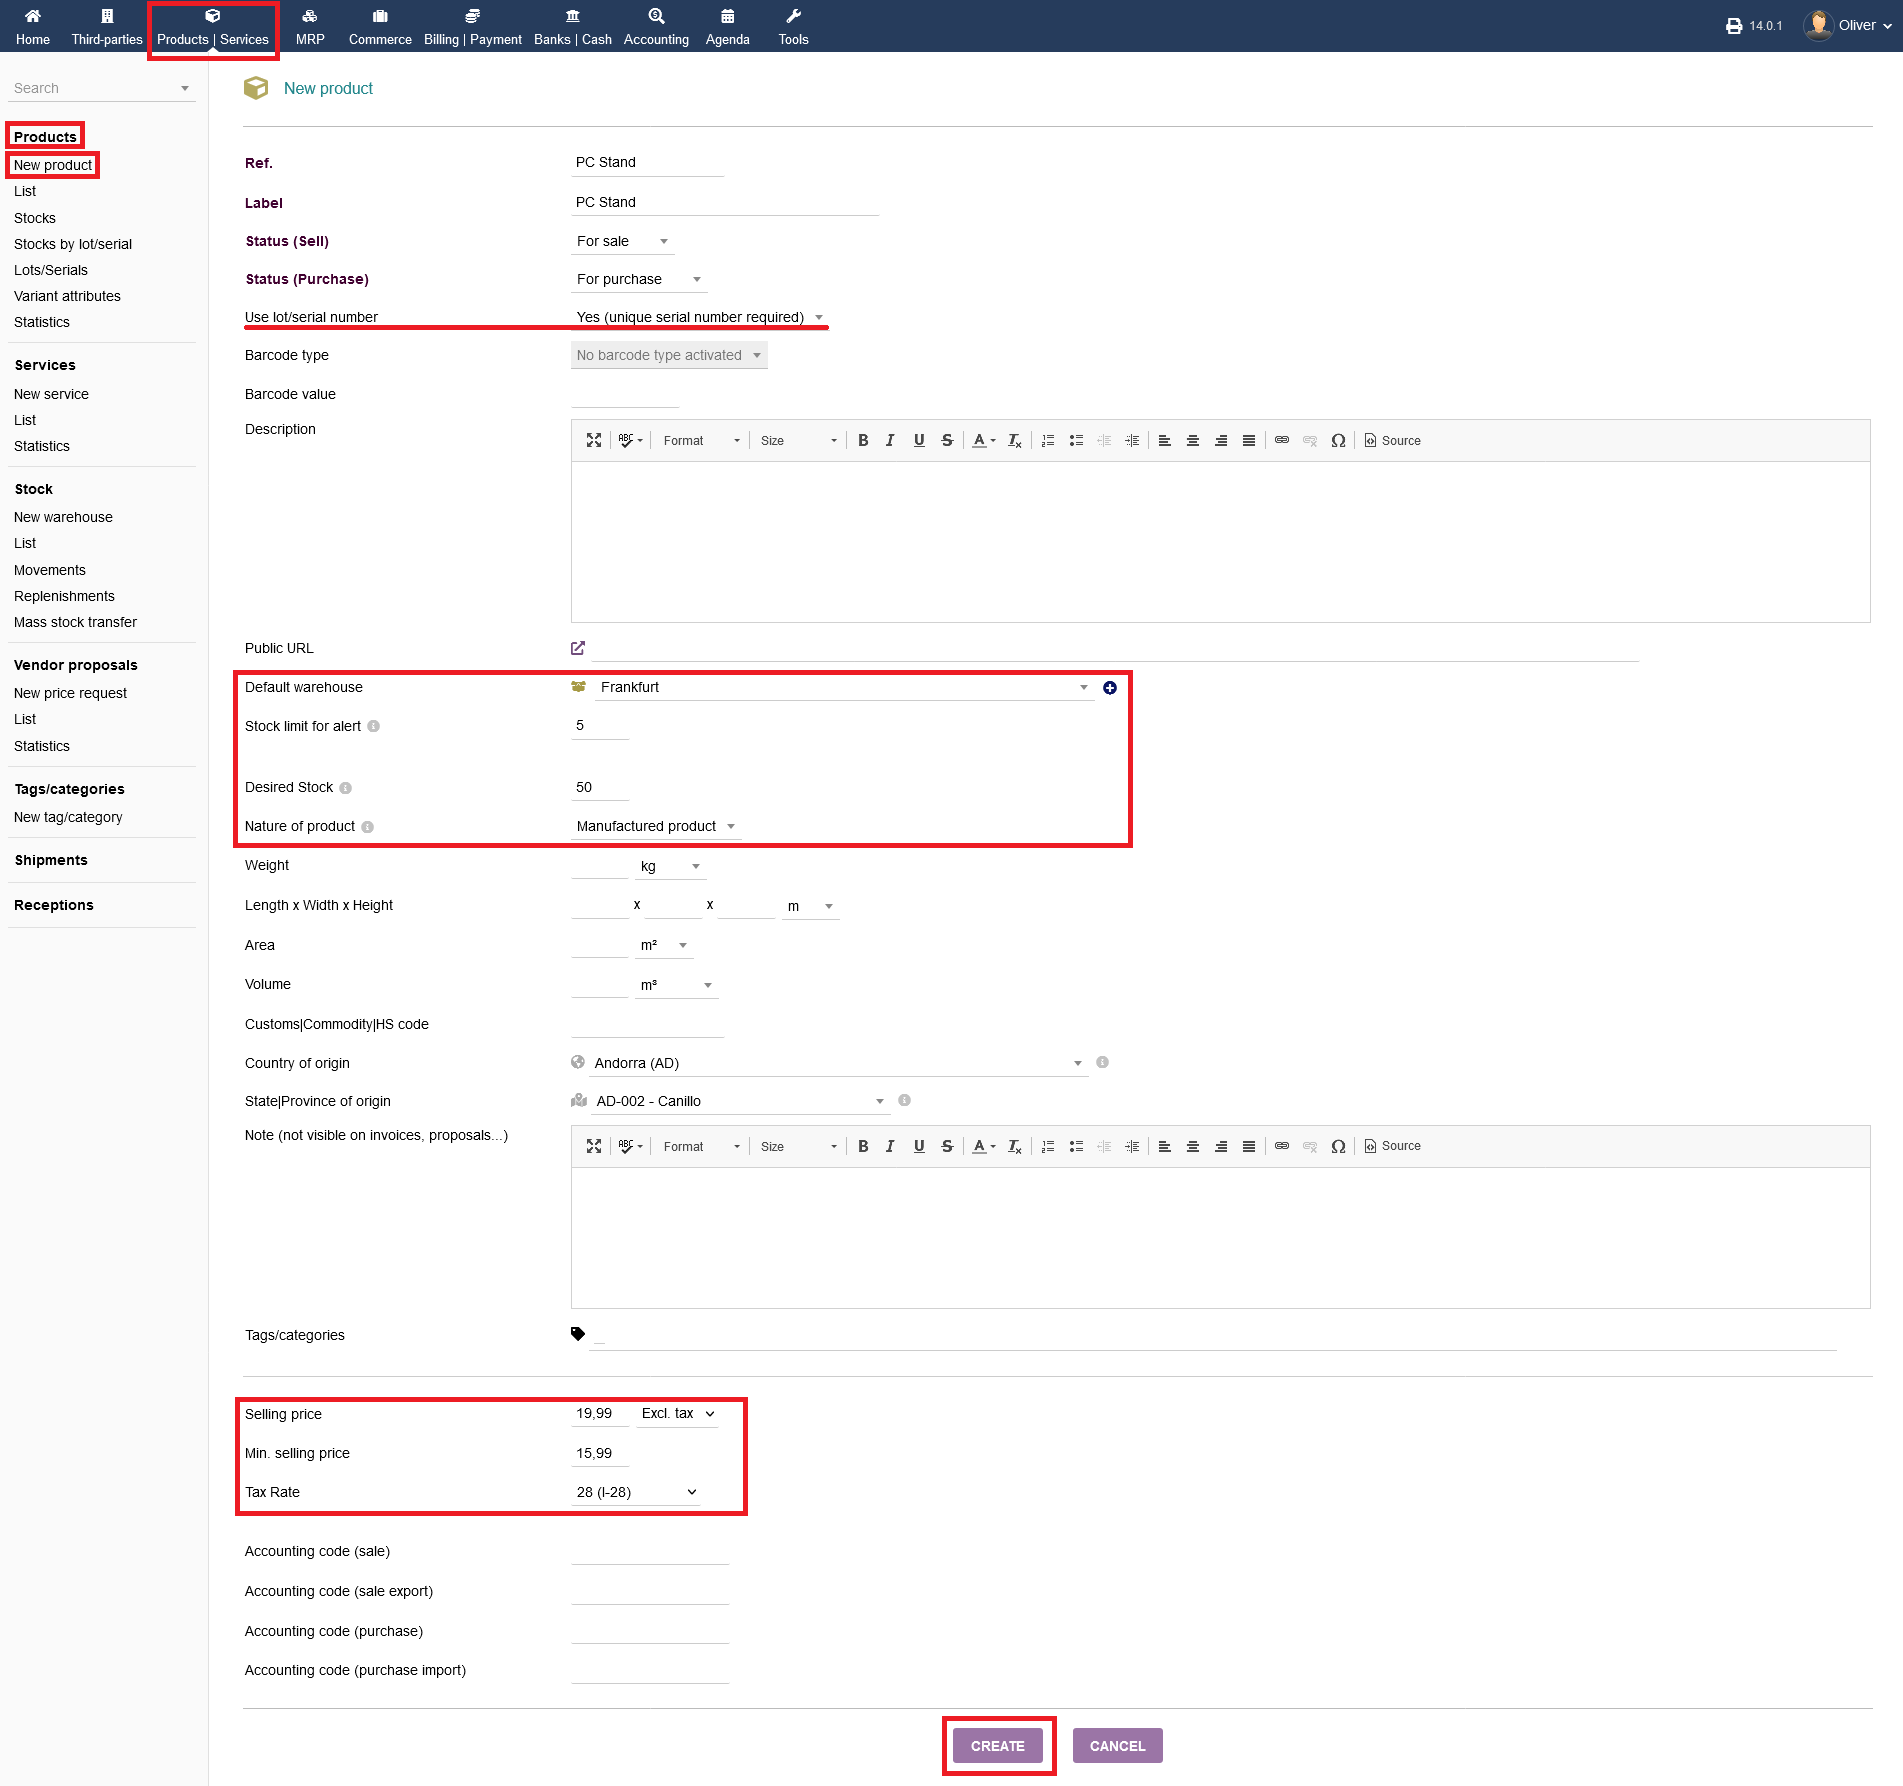
To create a new product, click on "New product -> Products -> New product". Fill out all necessary fields. Choose if the product is for sale, for purchase or both, using the drop down menu saying "Status (Sell)" and "Status (Purchase)". You can choose a lot and/or a barcode for further individualization of your item that you create by selecting from the respective drop down menus. Choose a warehouse where the product is stored from the respective drop down menu ( To create a warehouse) .
You can create a low stock limit warning by selecting a desired number of your choice under the section "Stock limit for alert". If you select no value, there will be no alert. If you fill in a zero, an alert will occur when your stock is completely empty. Additionally, you can define a stock value to how much your warehouse is supposed to replenish.
Fill in a value of your choice under "Desired Stock". Be aware to select, whether the product/service is a raw material to need further processing or whether it is a manufactured good that can be sold off finally. Choose accordingly from the drop down menu under the section "Nature of product". You can fill out the rest of the form to your desire, especially adding volume, origin, tags, prices, tax rate and accounting codes under the respective fields. Click on "CREATE" to finish adding your product.
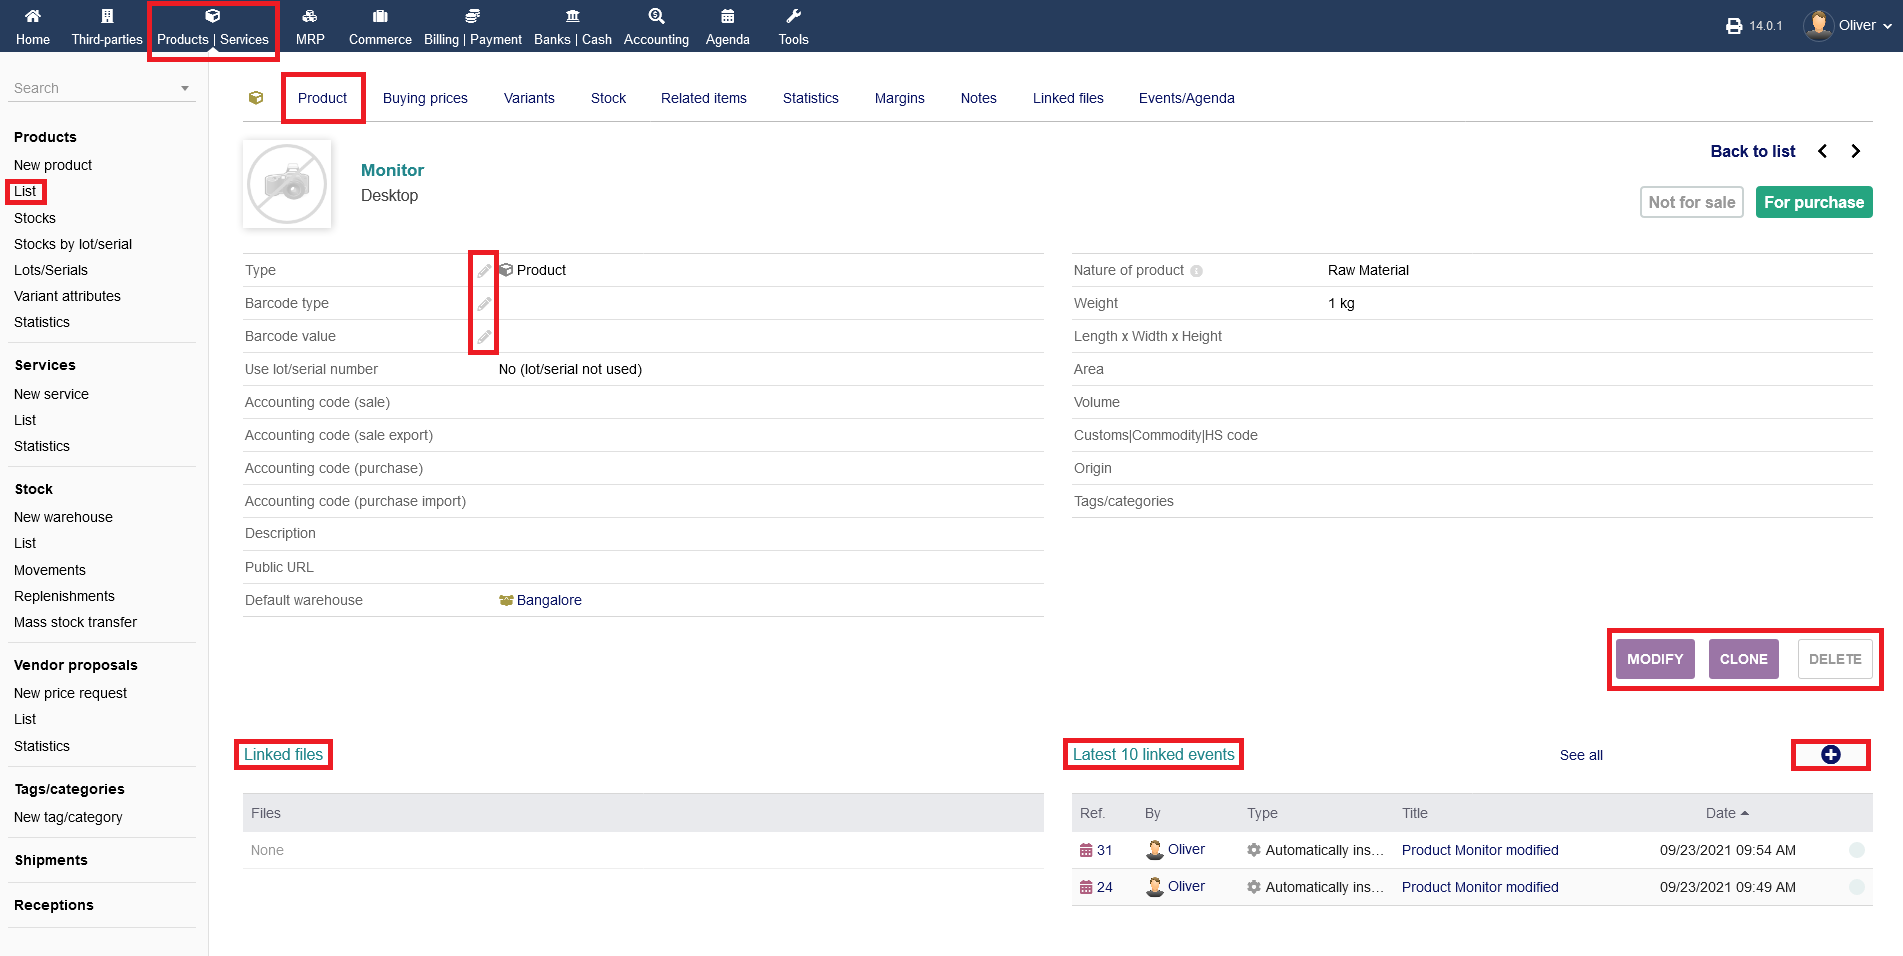
After you setup any products, you can manage them via the products listing under "Products/Services -> Products -> List".
Editing products
Do edit a product, click on the product name. You can change different entries by clicking on the "pen" icon. Alternatively, click on "MODIFY" to get to the editing form, where you can change all details regarding that product. If you want to make a similar product, use the cloning option by clicking on "CLONE". To delete the product, click on "DELETE". Additionally, you get an overview of any linked files specific to that product under the section "Linked files". Finally, you can see the last 10 events specific to that product under the section "Last 10 linked events". To add an event manually, click the "plus" icon and fill out the upcoming form with all necessary details. Finish by clicking "ADD" in the end.
Further option (products)
More options to your selected product can be found under the top menu bar within the product page.
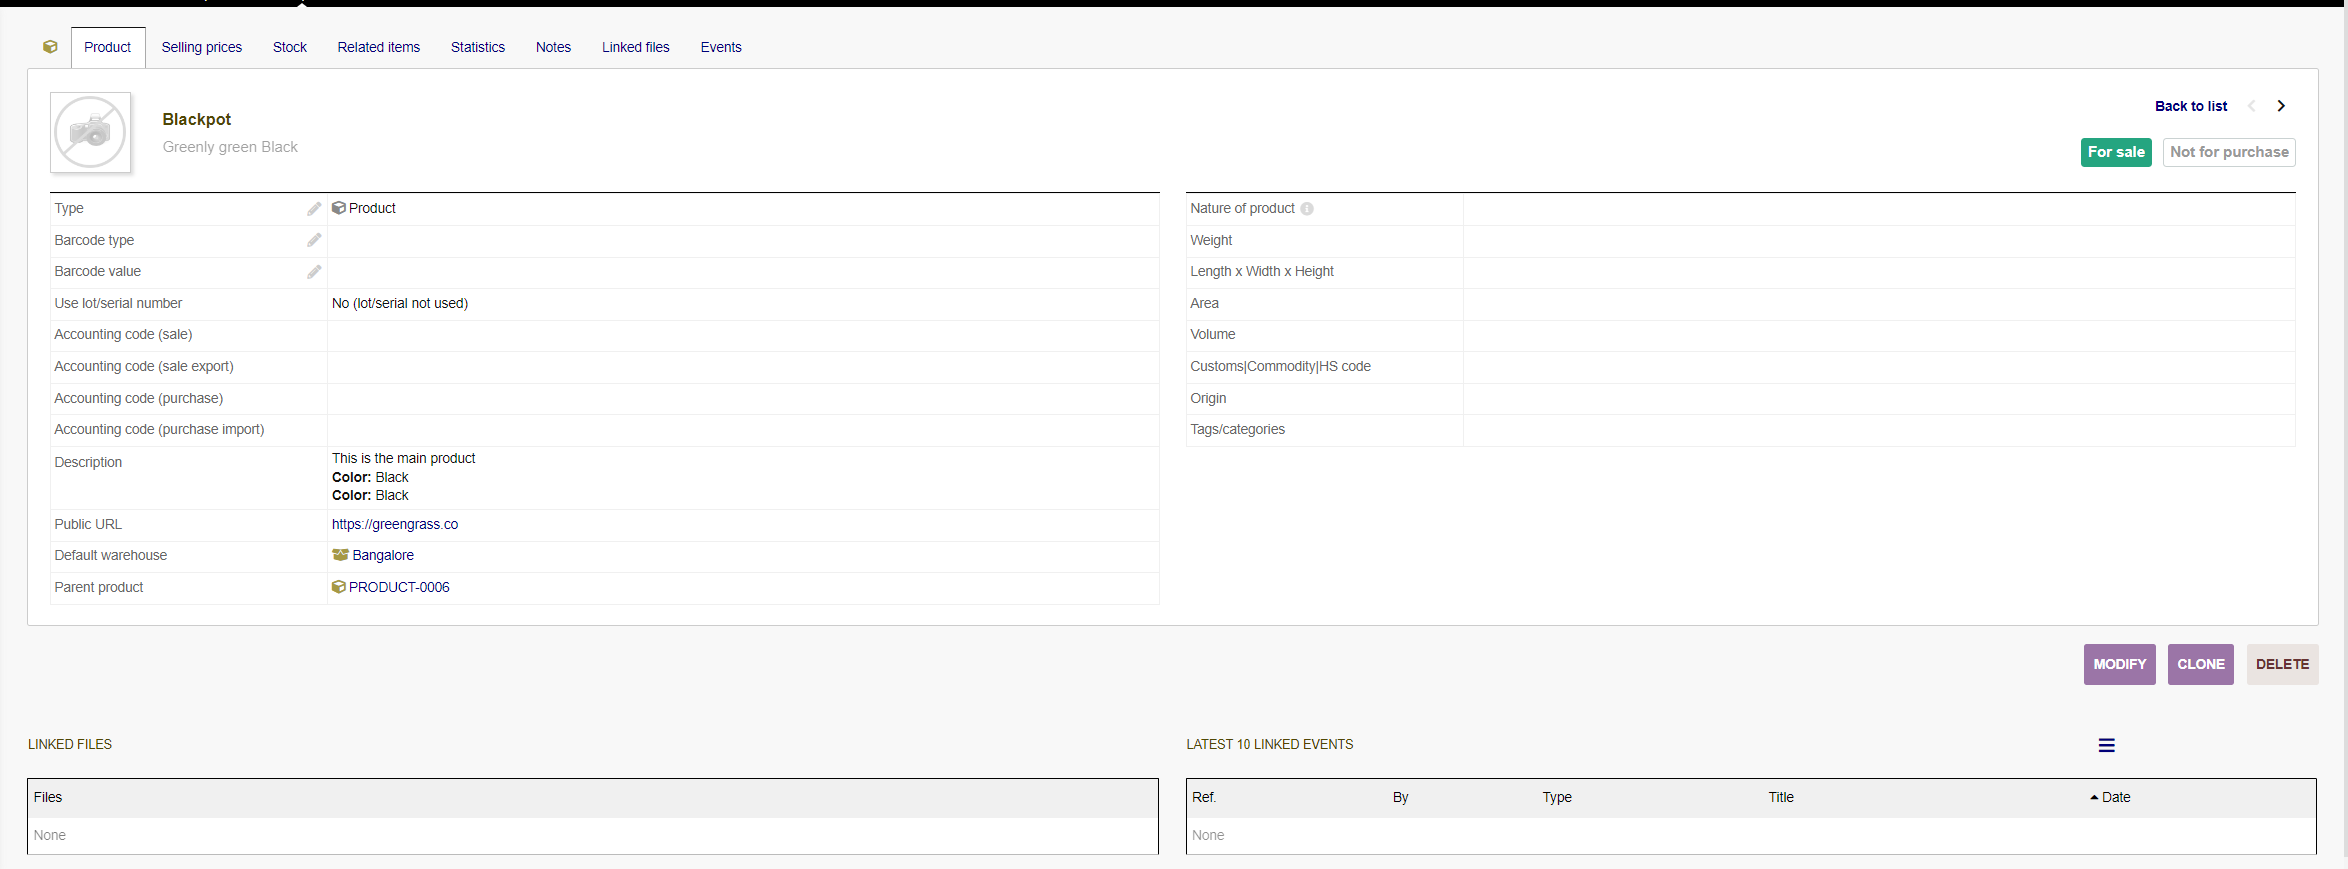
Product Tab :
On this tab you can see all the data of your product
Selling prices Tab :
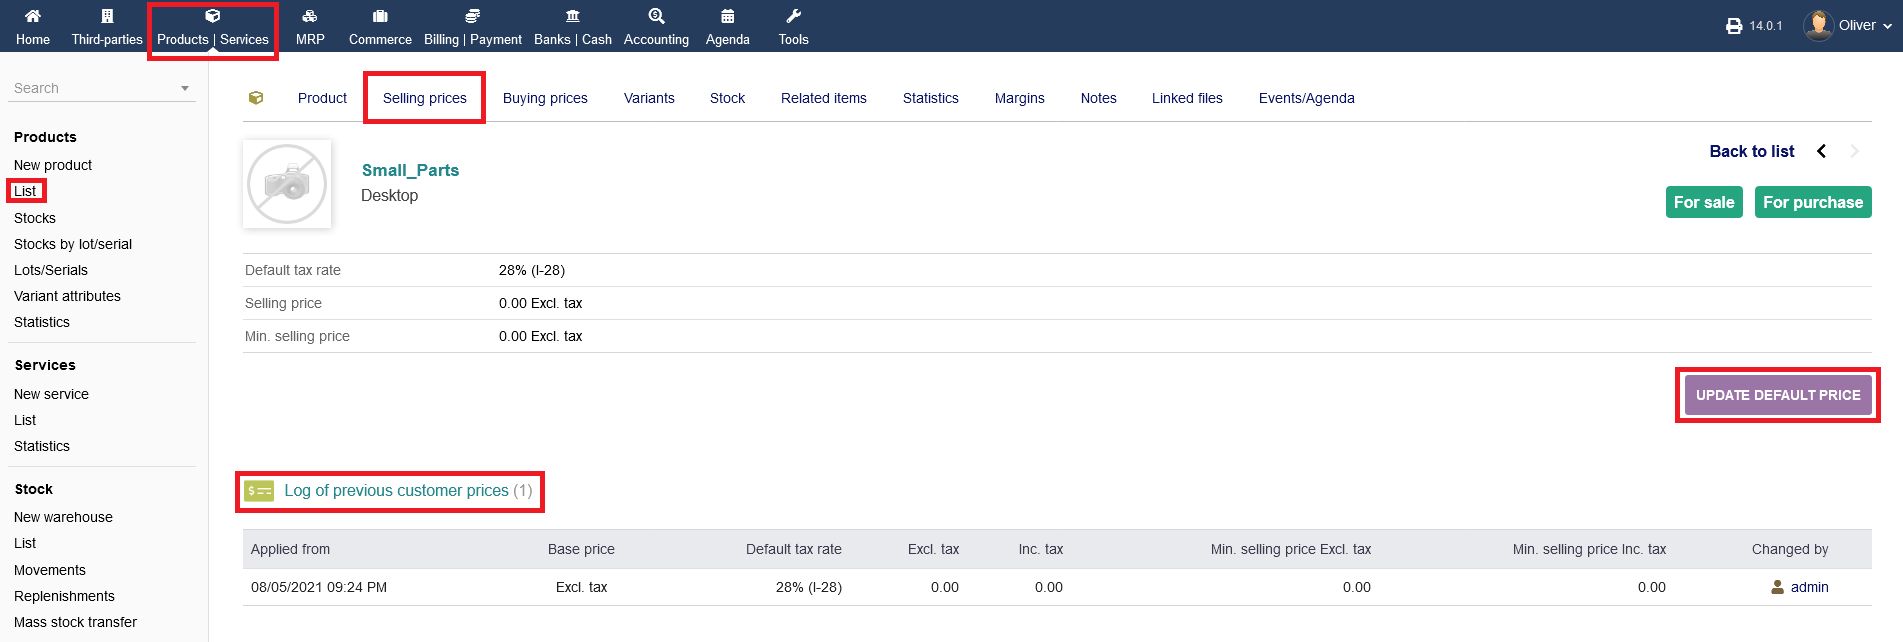
Under the tab "Selling prices", you get an overview of the selling prices to that related product. You can change the default price by clicking "UPDATE DEFAULT PRICE". Note, that this option is only available for parent products. If you selected a product variant, you need to go to the parent product page and change the variant pricings there. When you updated the default pricing, click "SAVE" in the end. Below, on the "Selling prices" tab you see a log of all price changes.
Buying prices Tab :
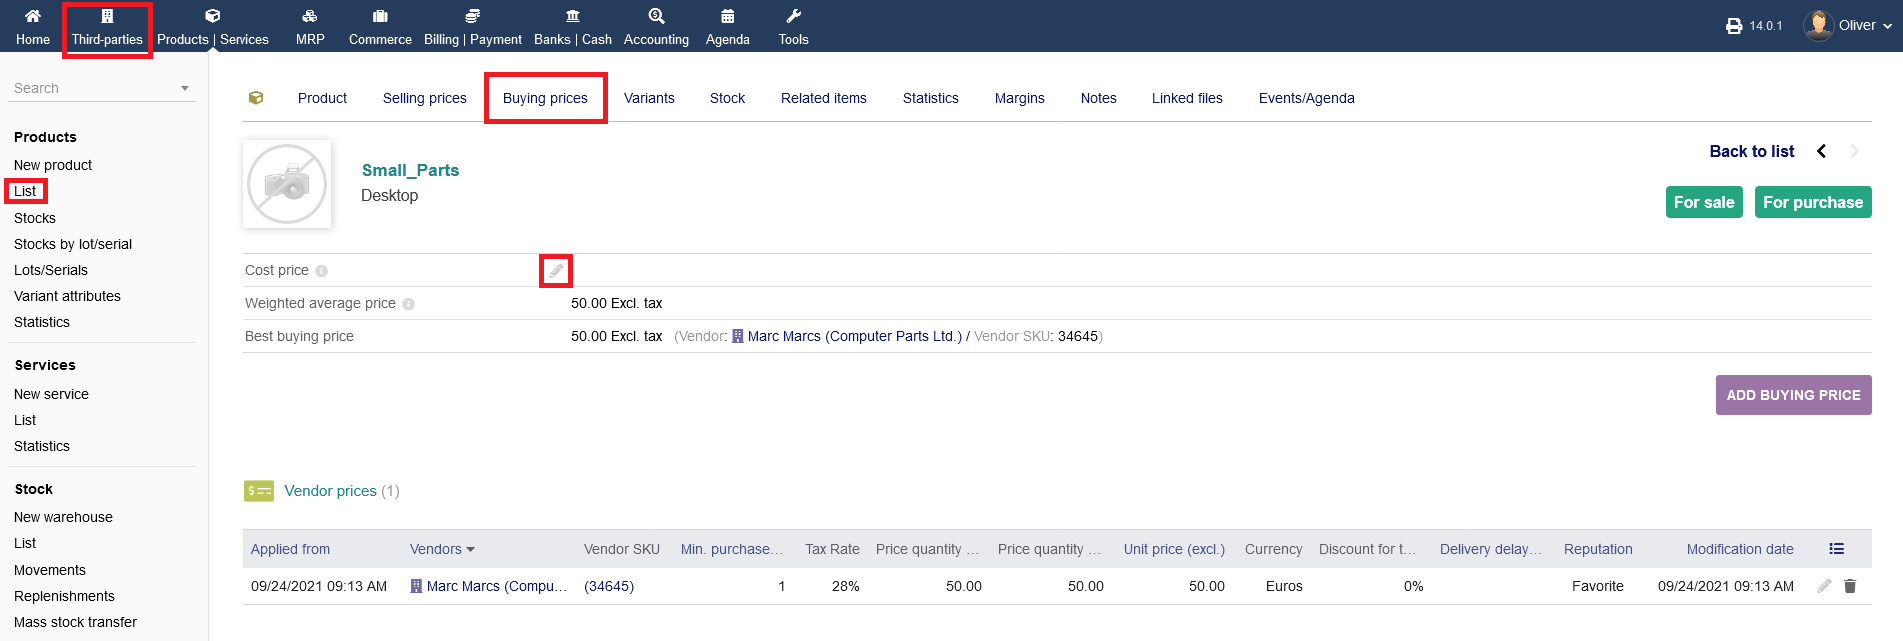
Under the tab "Buying prices", you get an overview of the buying prices of your selected product. You can change the cost price by clicking the "pen" icon. For adding or changing the buy price click "ADD BUYING PRICE".
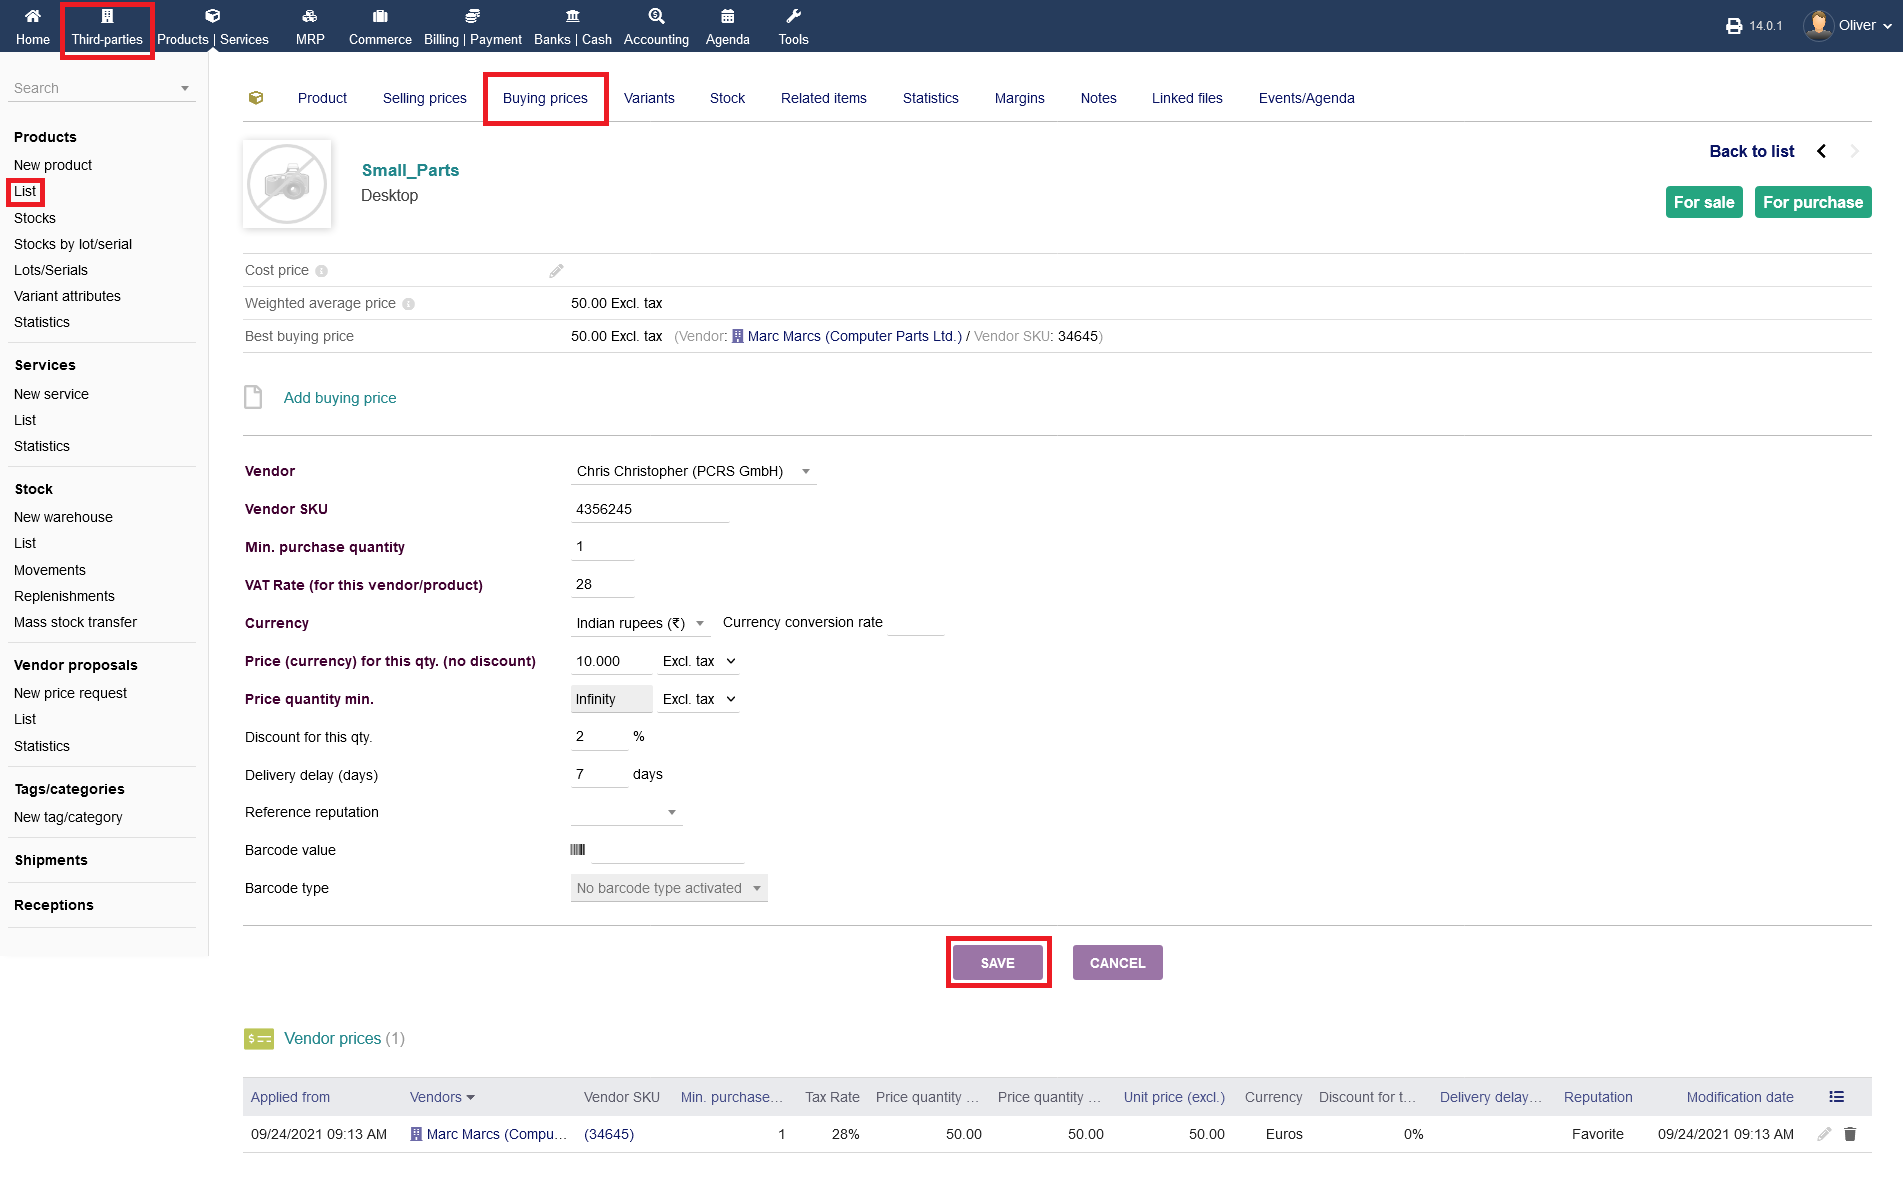
You can select a third party vendor to order the product from and define a purchase quantity, VAT rate, currency, prices, discounts, delivery parameters and reputation of the vendor. In case you use barcodes, you can add them as the last option. Click "SAVE" to finish the process.
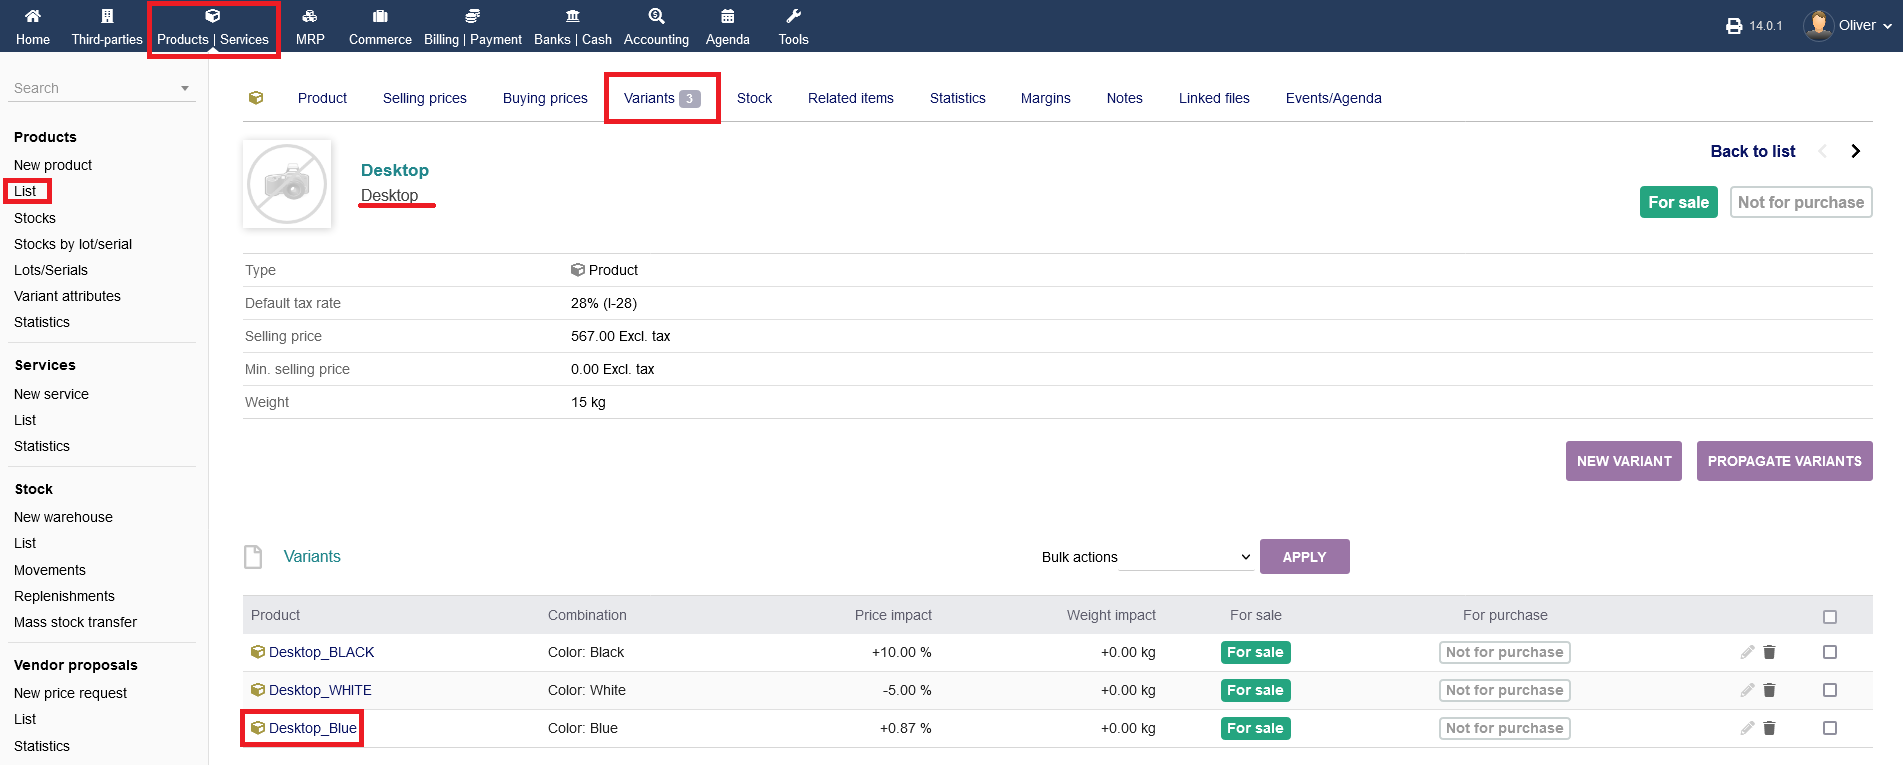
Variants Tab :
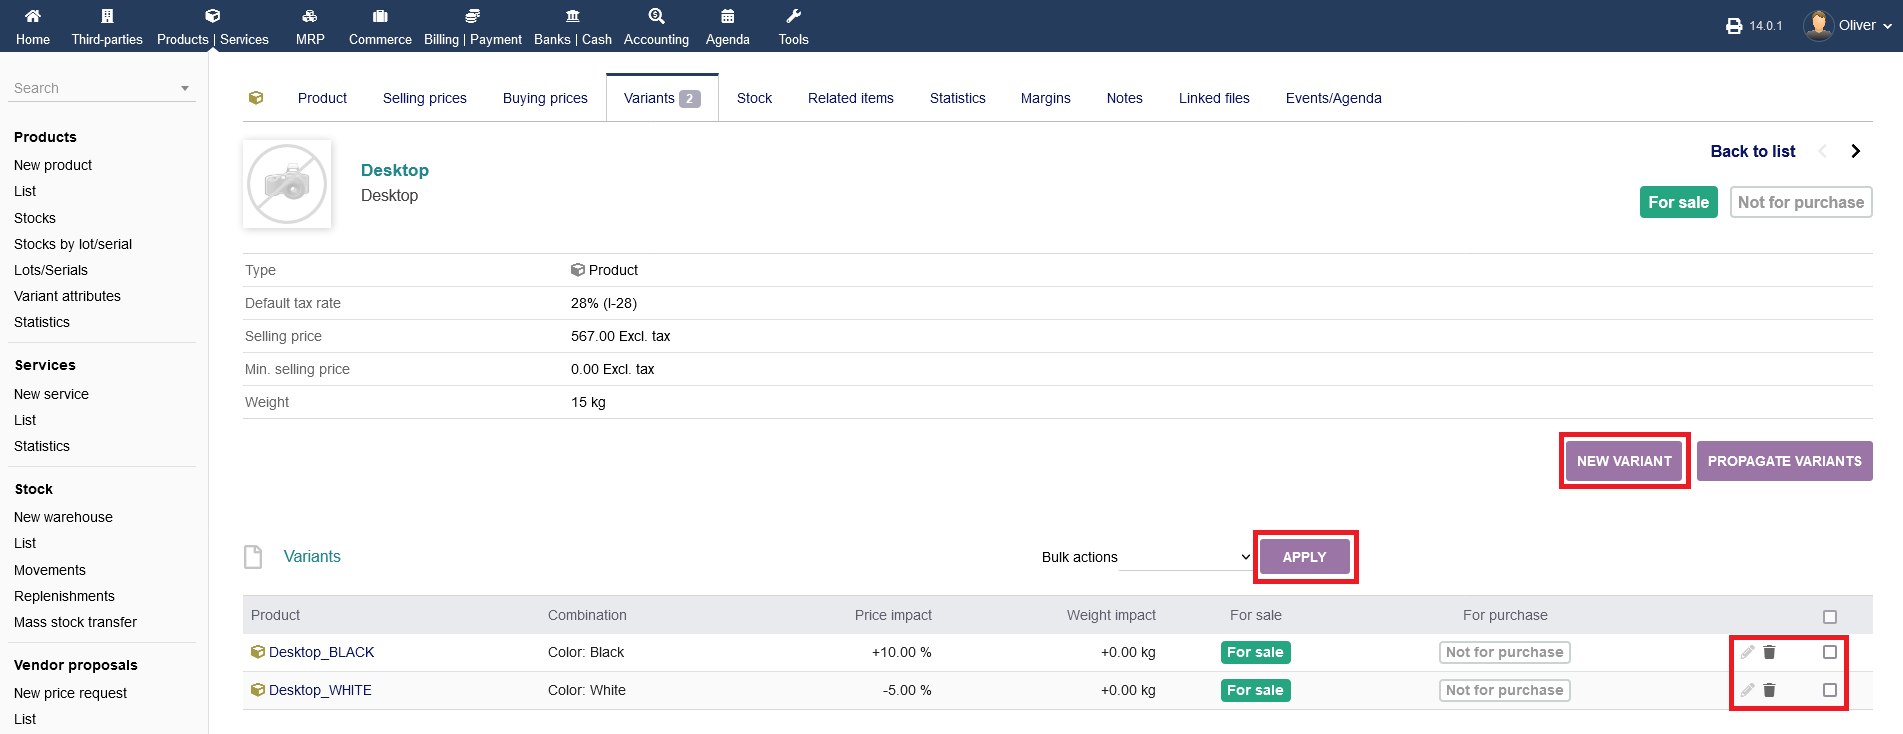
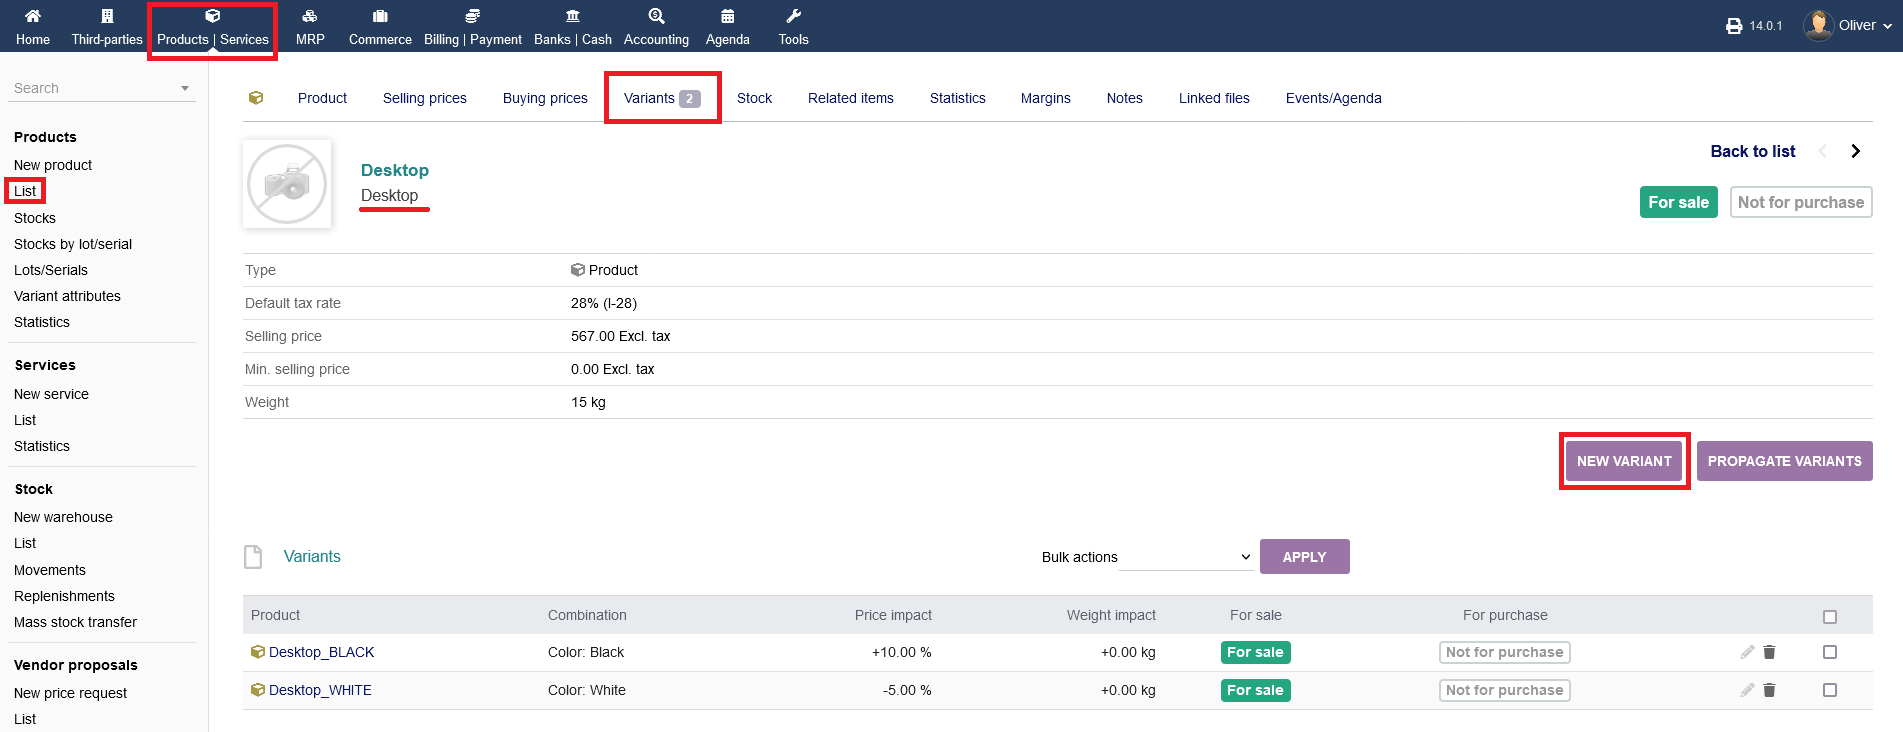
If you have different variants of that product, all variants will be listed under the tab "Variants". In case you are in the product page of a variant product, this option wont appear as a selectable menu tab. You can create a new variant by clicking on "NEW VARIANT". To propagate variants, click on "PROPAGATE VARIANTS". The latter option is not available, if there are no variants present. All variants will be shown in the listing below. You can edit them by clicking on the "pen" icon and deleting them by clicking on the "trash" icon. To perform a bulk action, select your product variants by clicking on the radio boxes, select an action from the drop down menu above and click "APPLY".
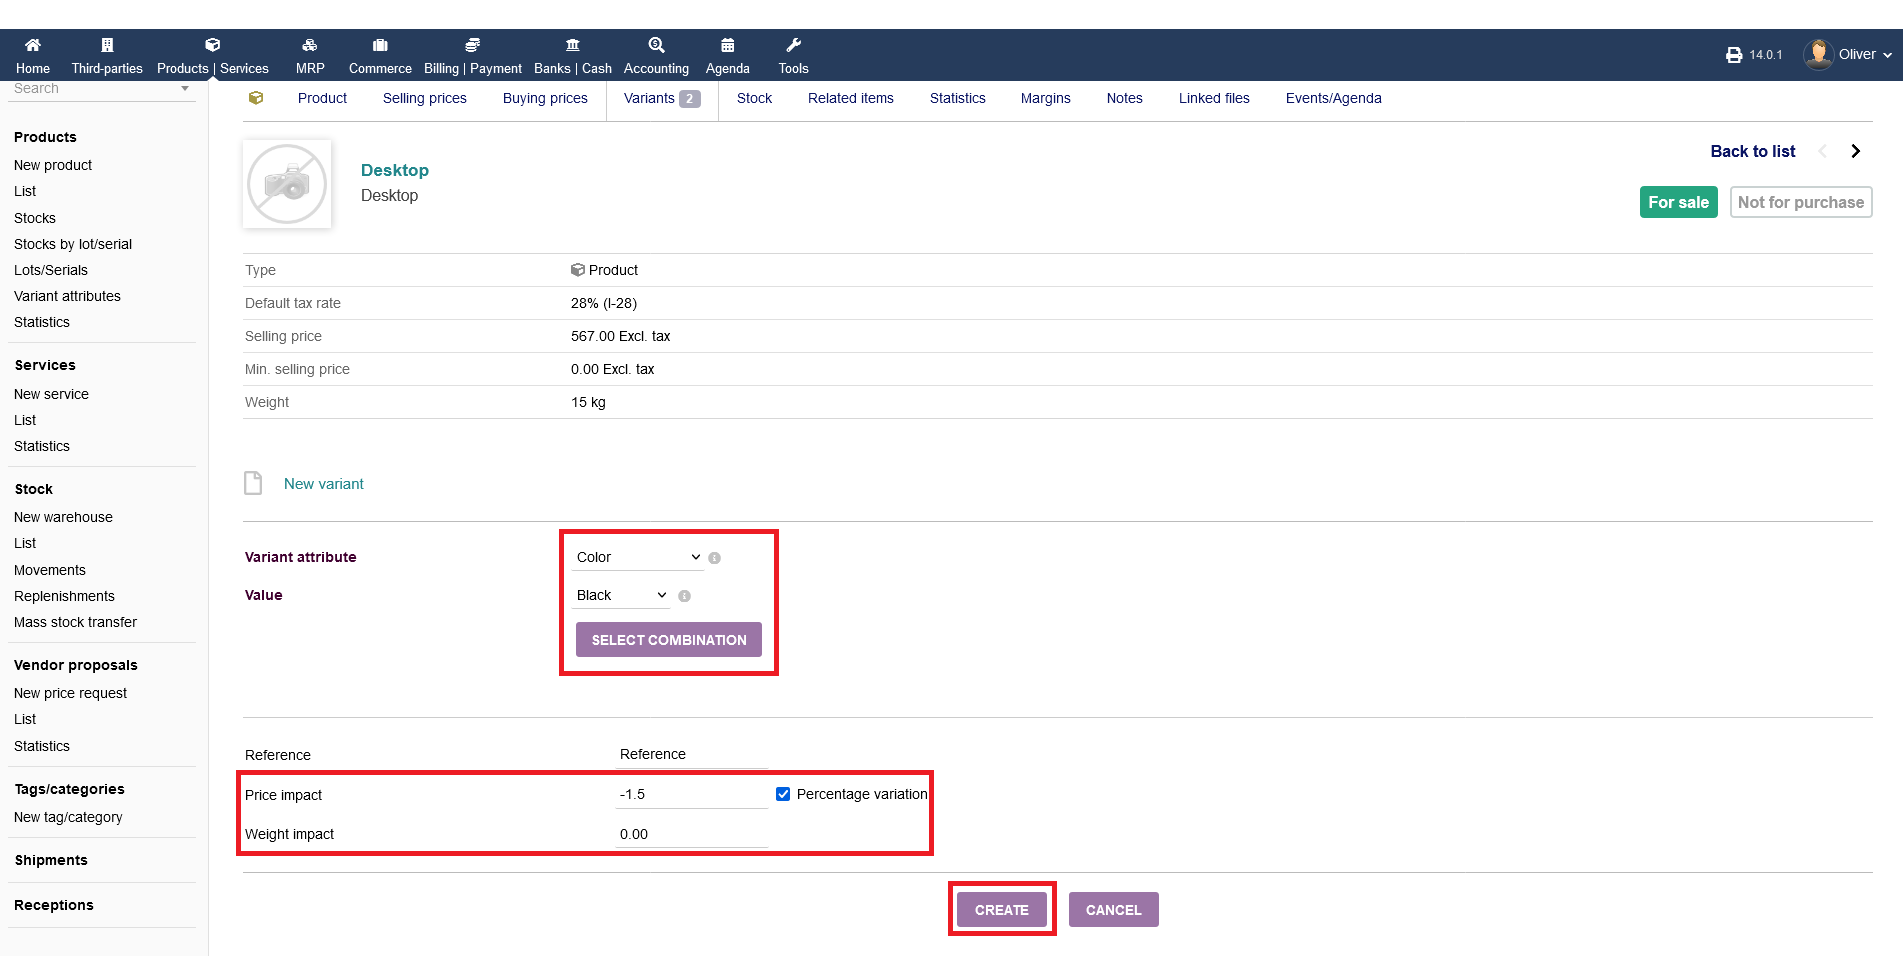
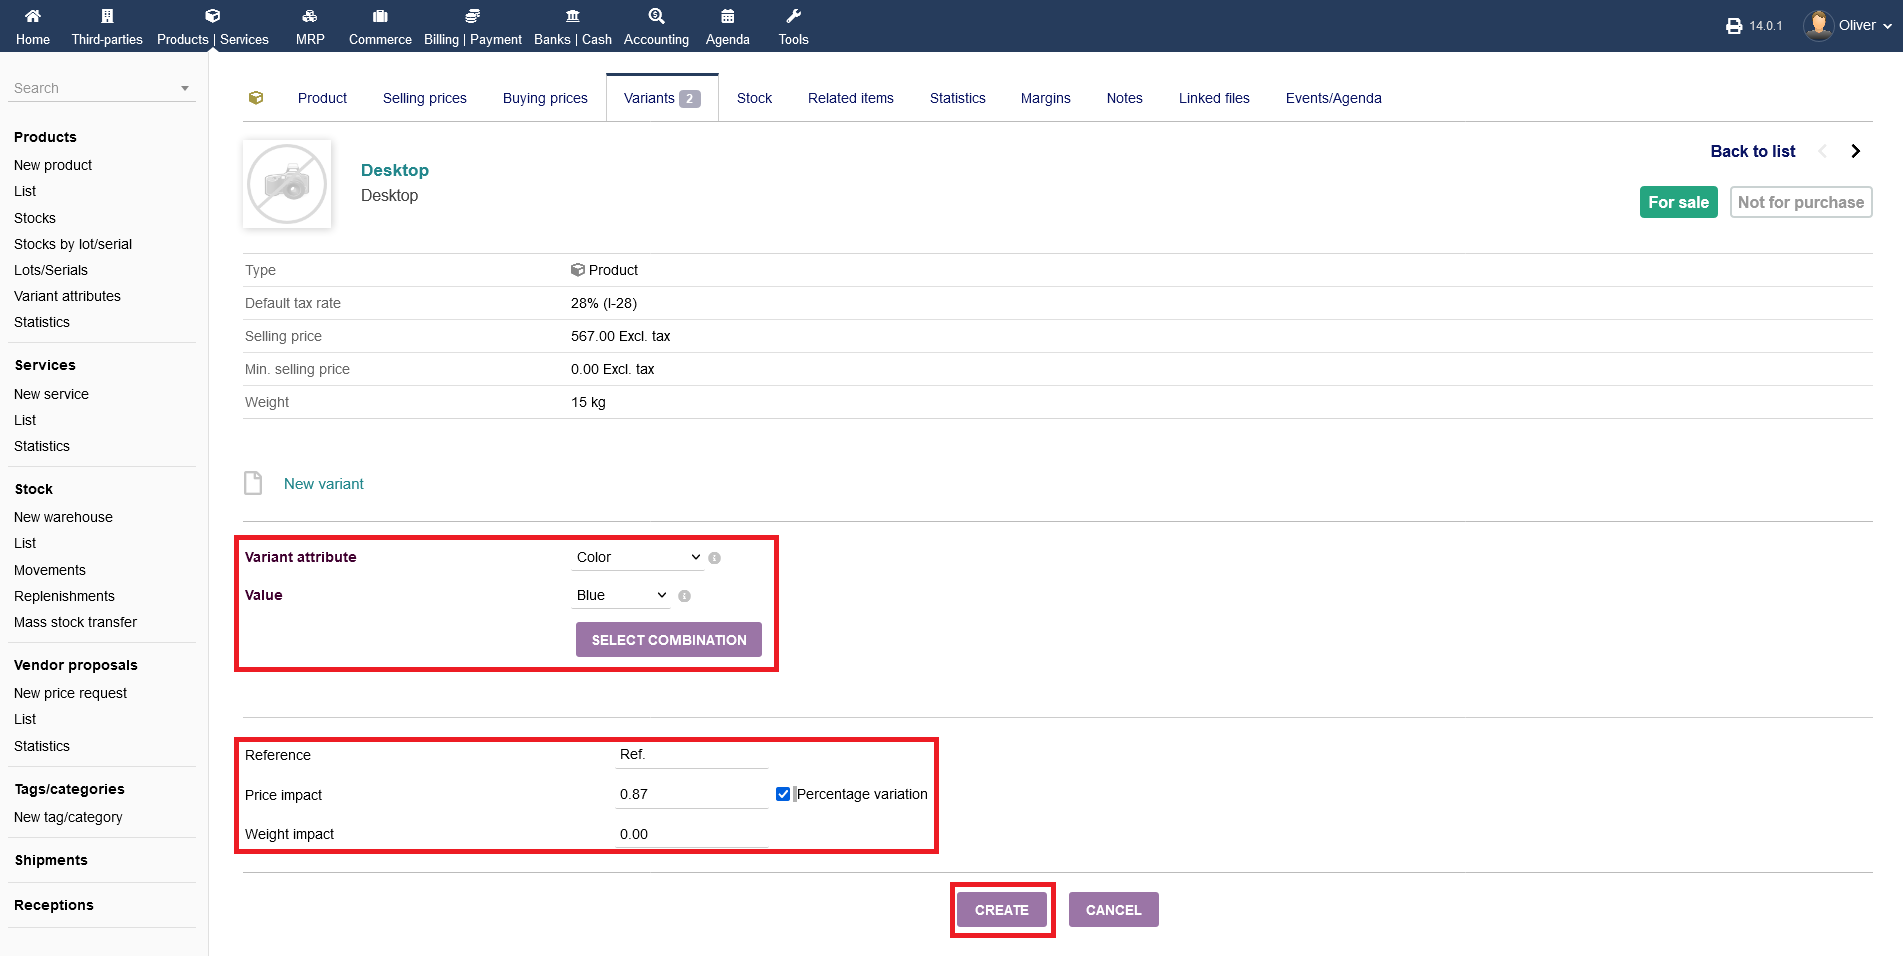
After clicking on "NEW VARIANT", you can choose a predefined attribute, you setup under "Variant attributes" in the left side menu (see documentation below), such as color, size etc. and select a value like white, xxl etc. Click on "SELECT COMBINATION" to choose that variant parameters. Finally, you can make adjustments to the pricing for that variant, using percentage values. The value can be negative. You have the same option for the product weight. Click "CREATE" to finish the process.
Stock Tab :
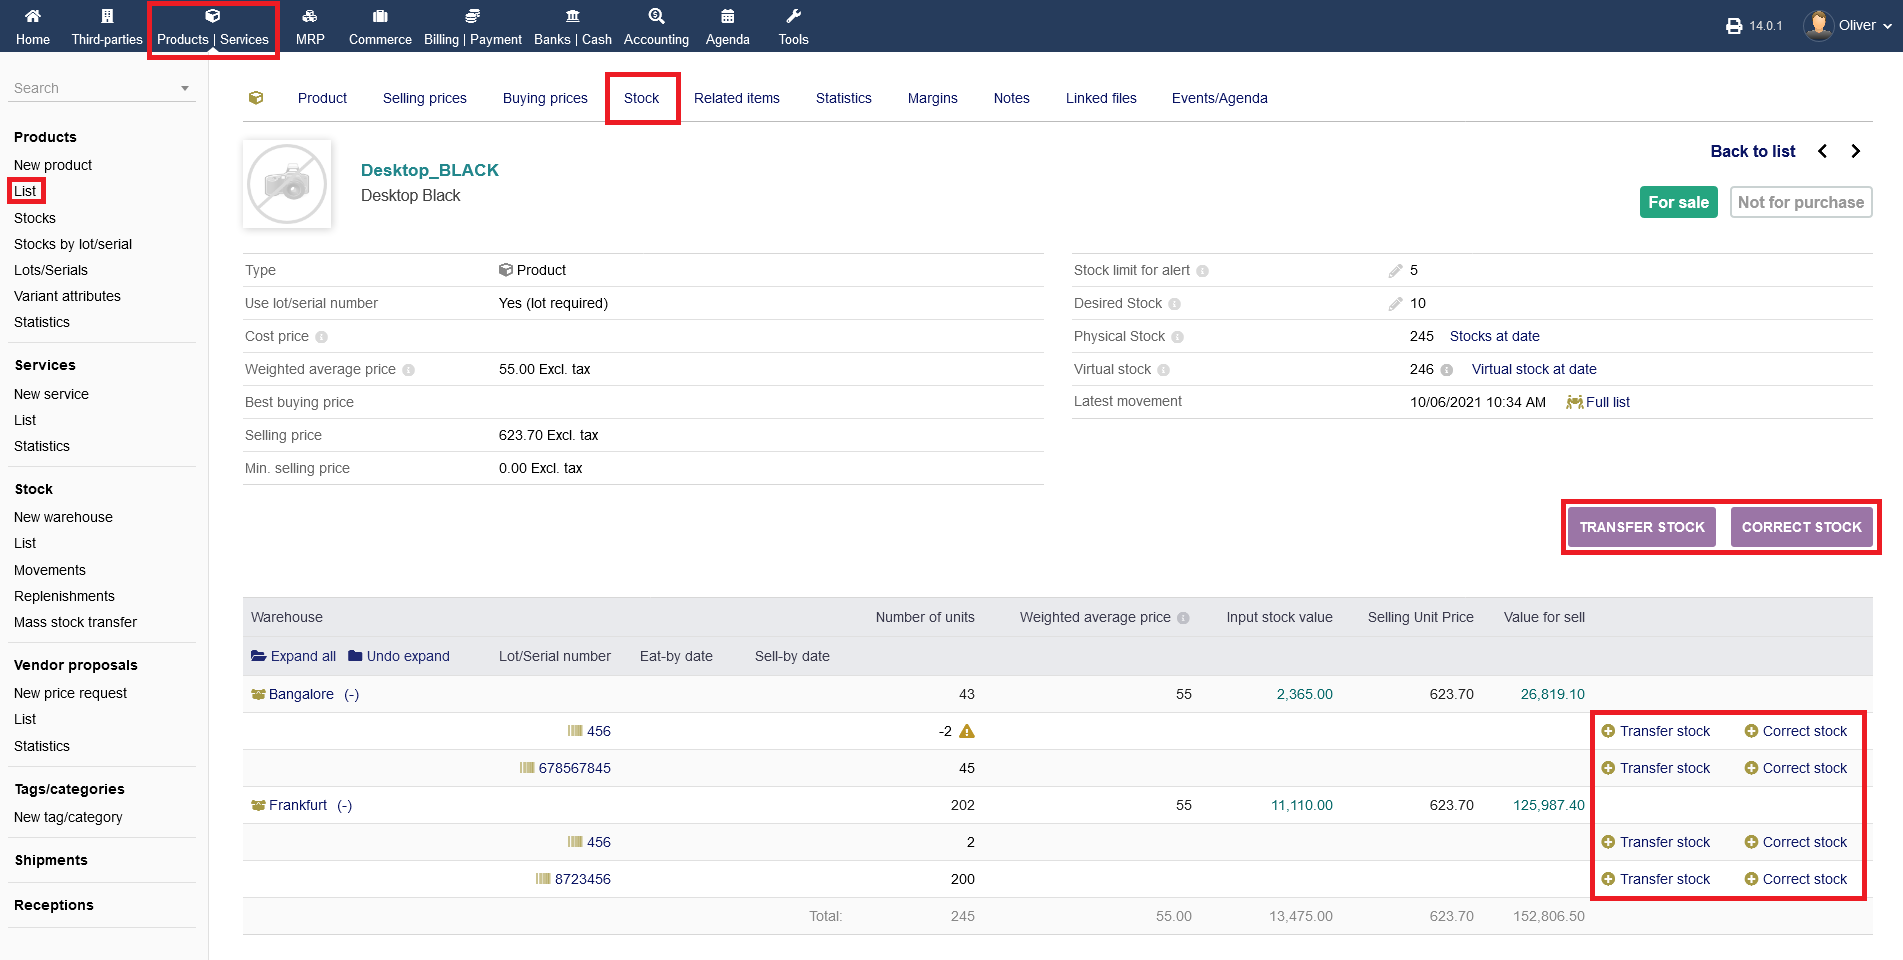
Under "Stock" you can manage the stock of your product. Note, a parent products stock cannot be managed, only its product variants. Stock transfer and correction options wont be available. Instead, you can click the "pen" icon right of the product variant to be able to transfer or correct stock.

There, you can set a stock limit alert by units and a desired stock by clicking the respective buttons. To transfer stock between warehouses, click "TRANSFER STOCK". To correct the products stock in warehouses, click "CORRECT STOCK".
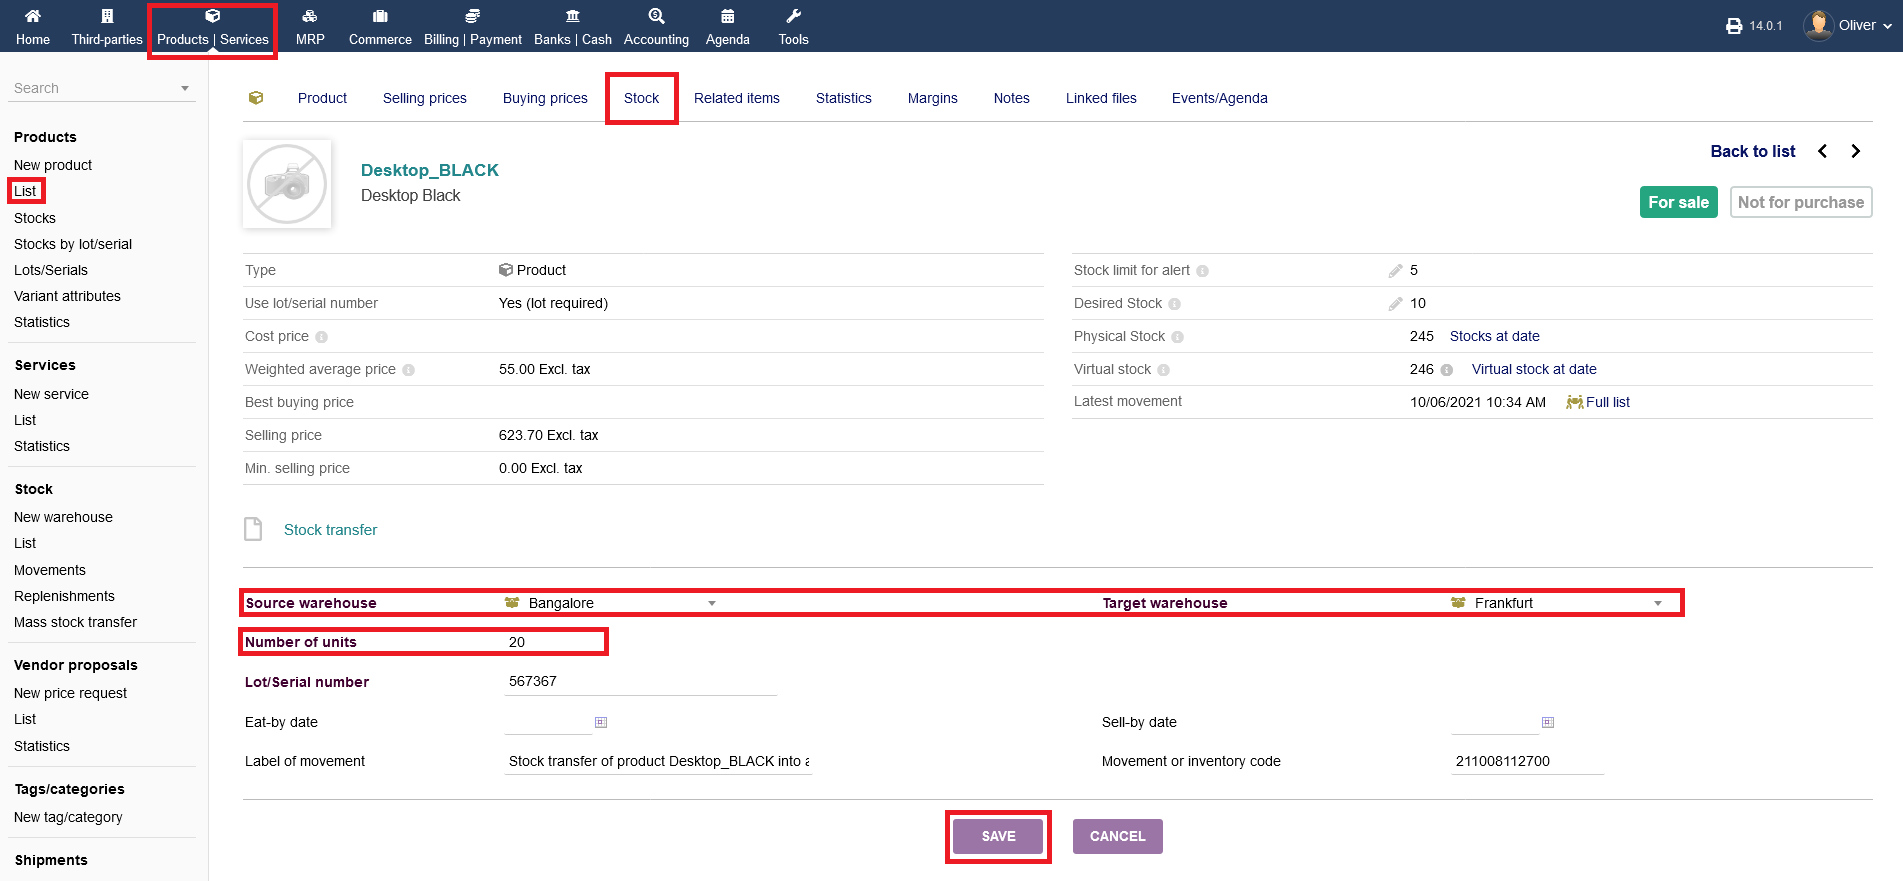
For transferring stock in the next screen, you have to choose your source warehouse, target warehouse, number of units which you want to move and possible lot/serial numbers, mainly. Click "SAVE" to finish the process.
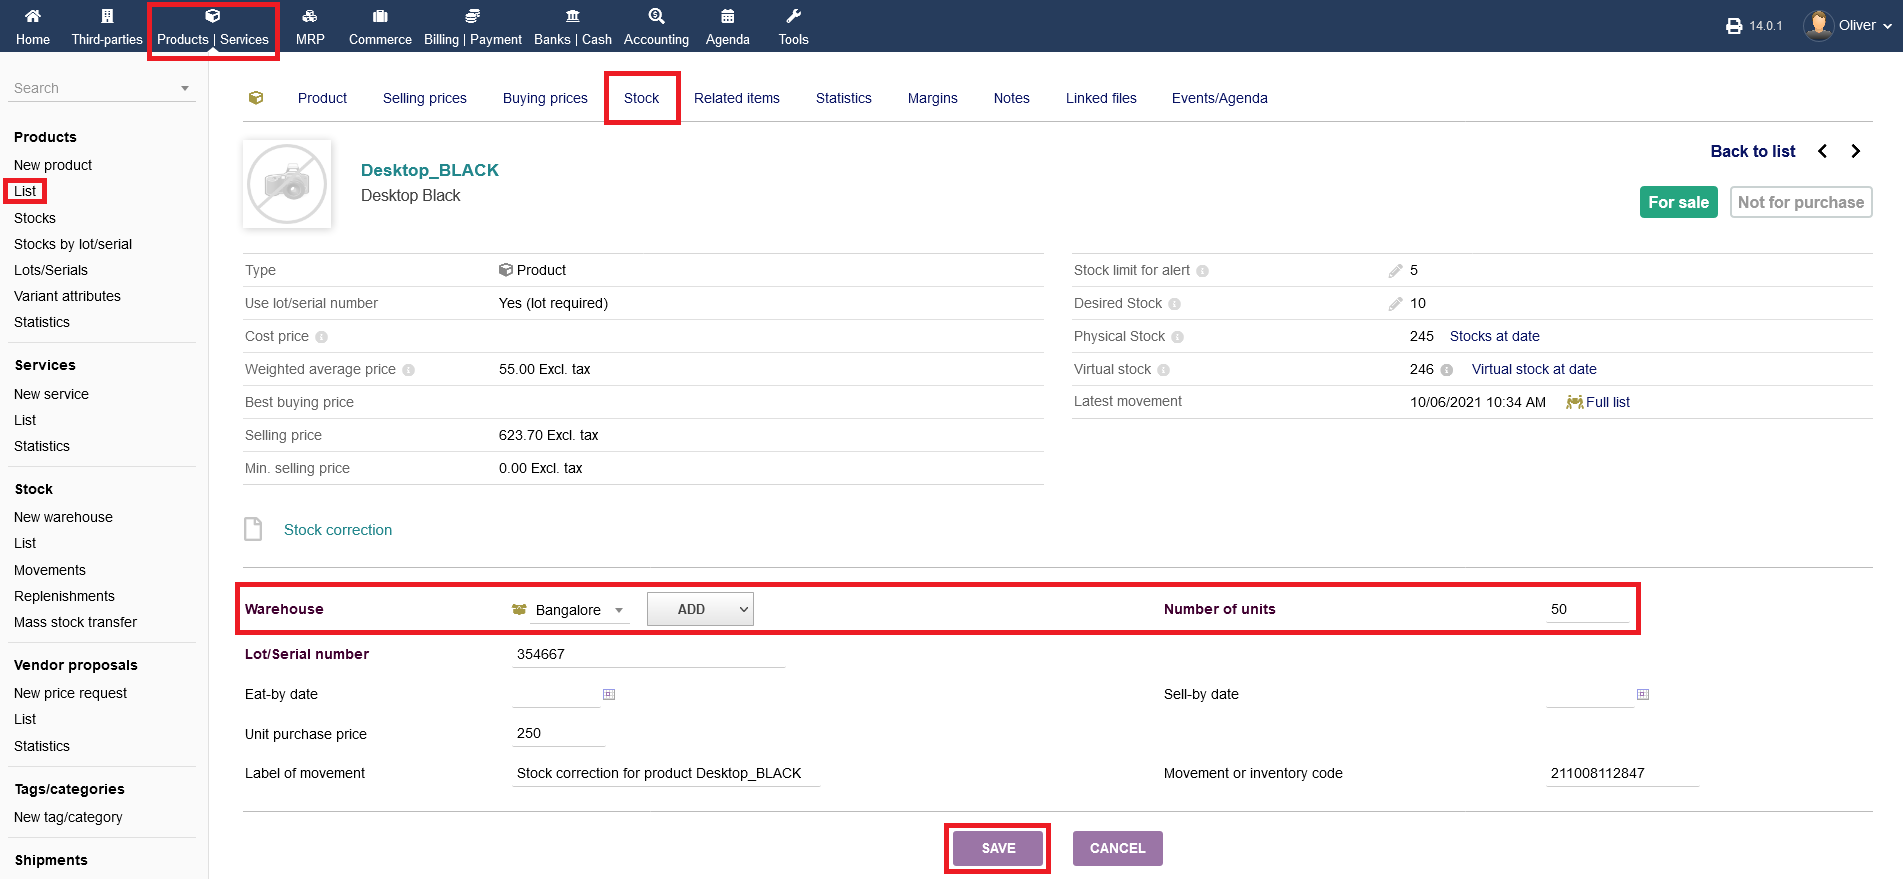
To correct your stock, your main option in the next screen are choosing a warehouse defining a number of units you want to correct to and a possible lot/serial number. Further options are option or up to your needs. Click "SAVE" to finish the process.
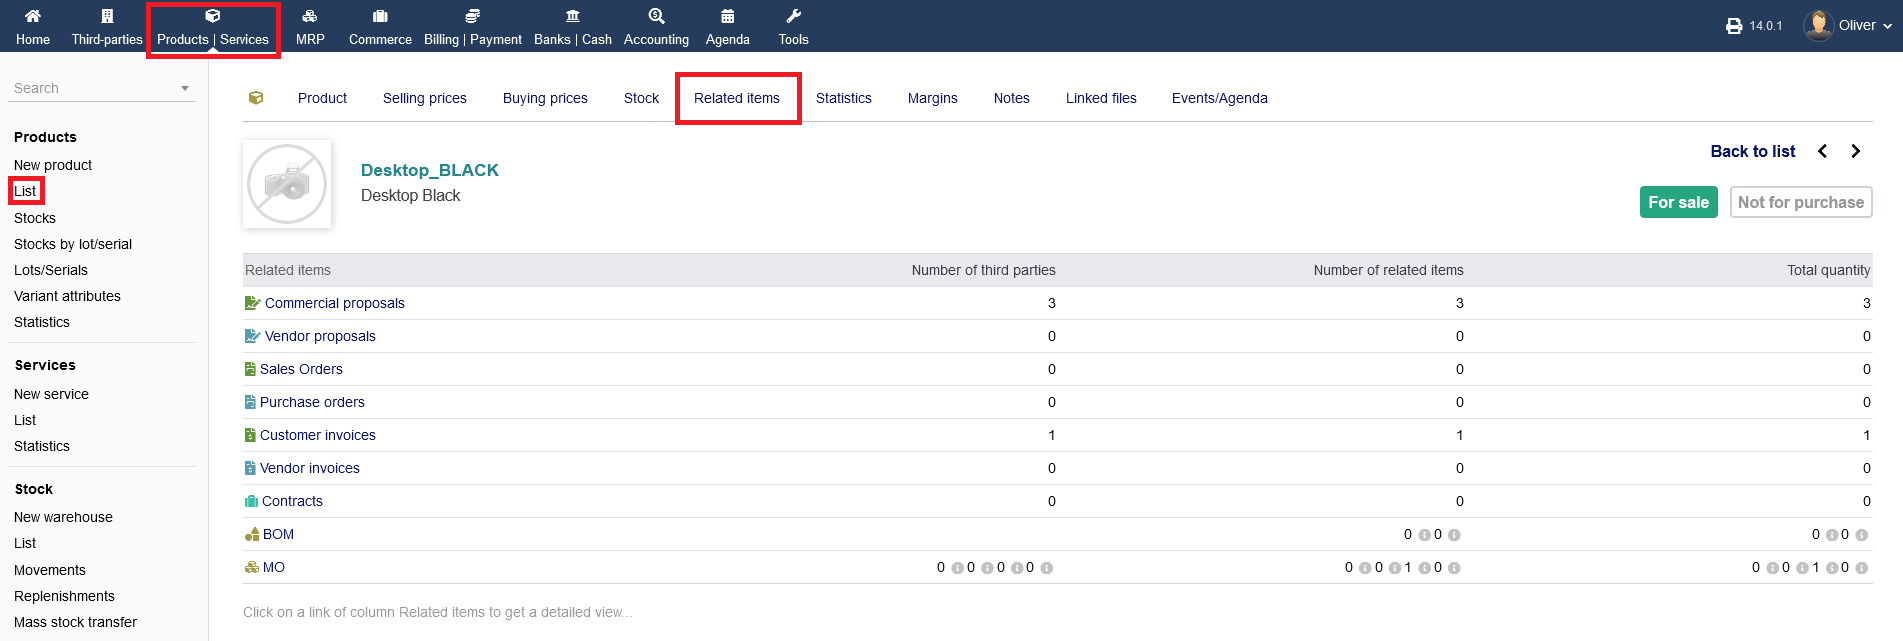
Related Items Tab :
The tab menu "Related Items" only shows you an overview of items/categories/sections where the specific product is related to.
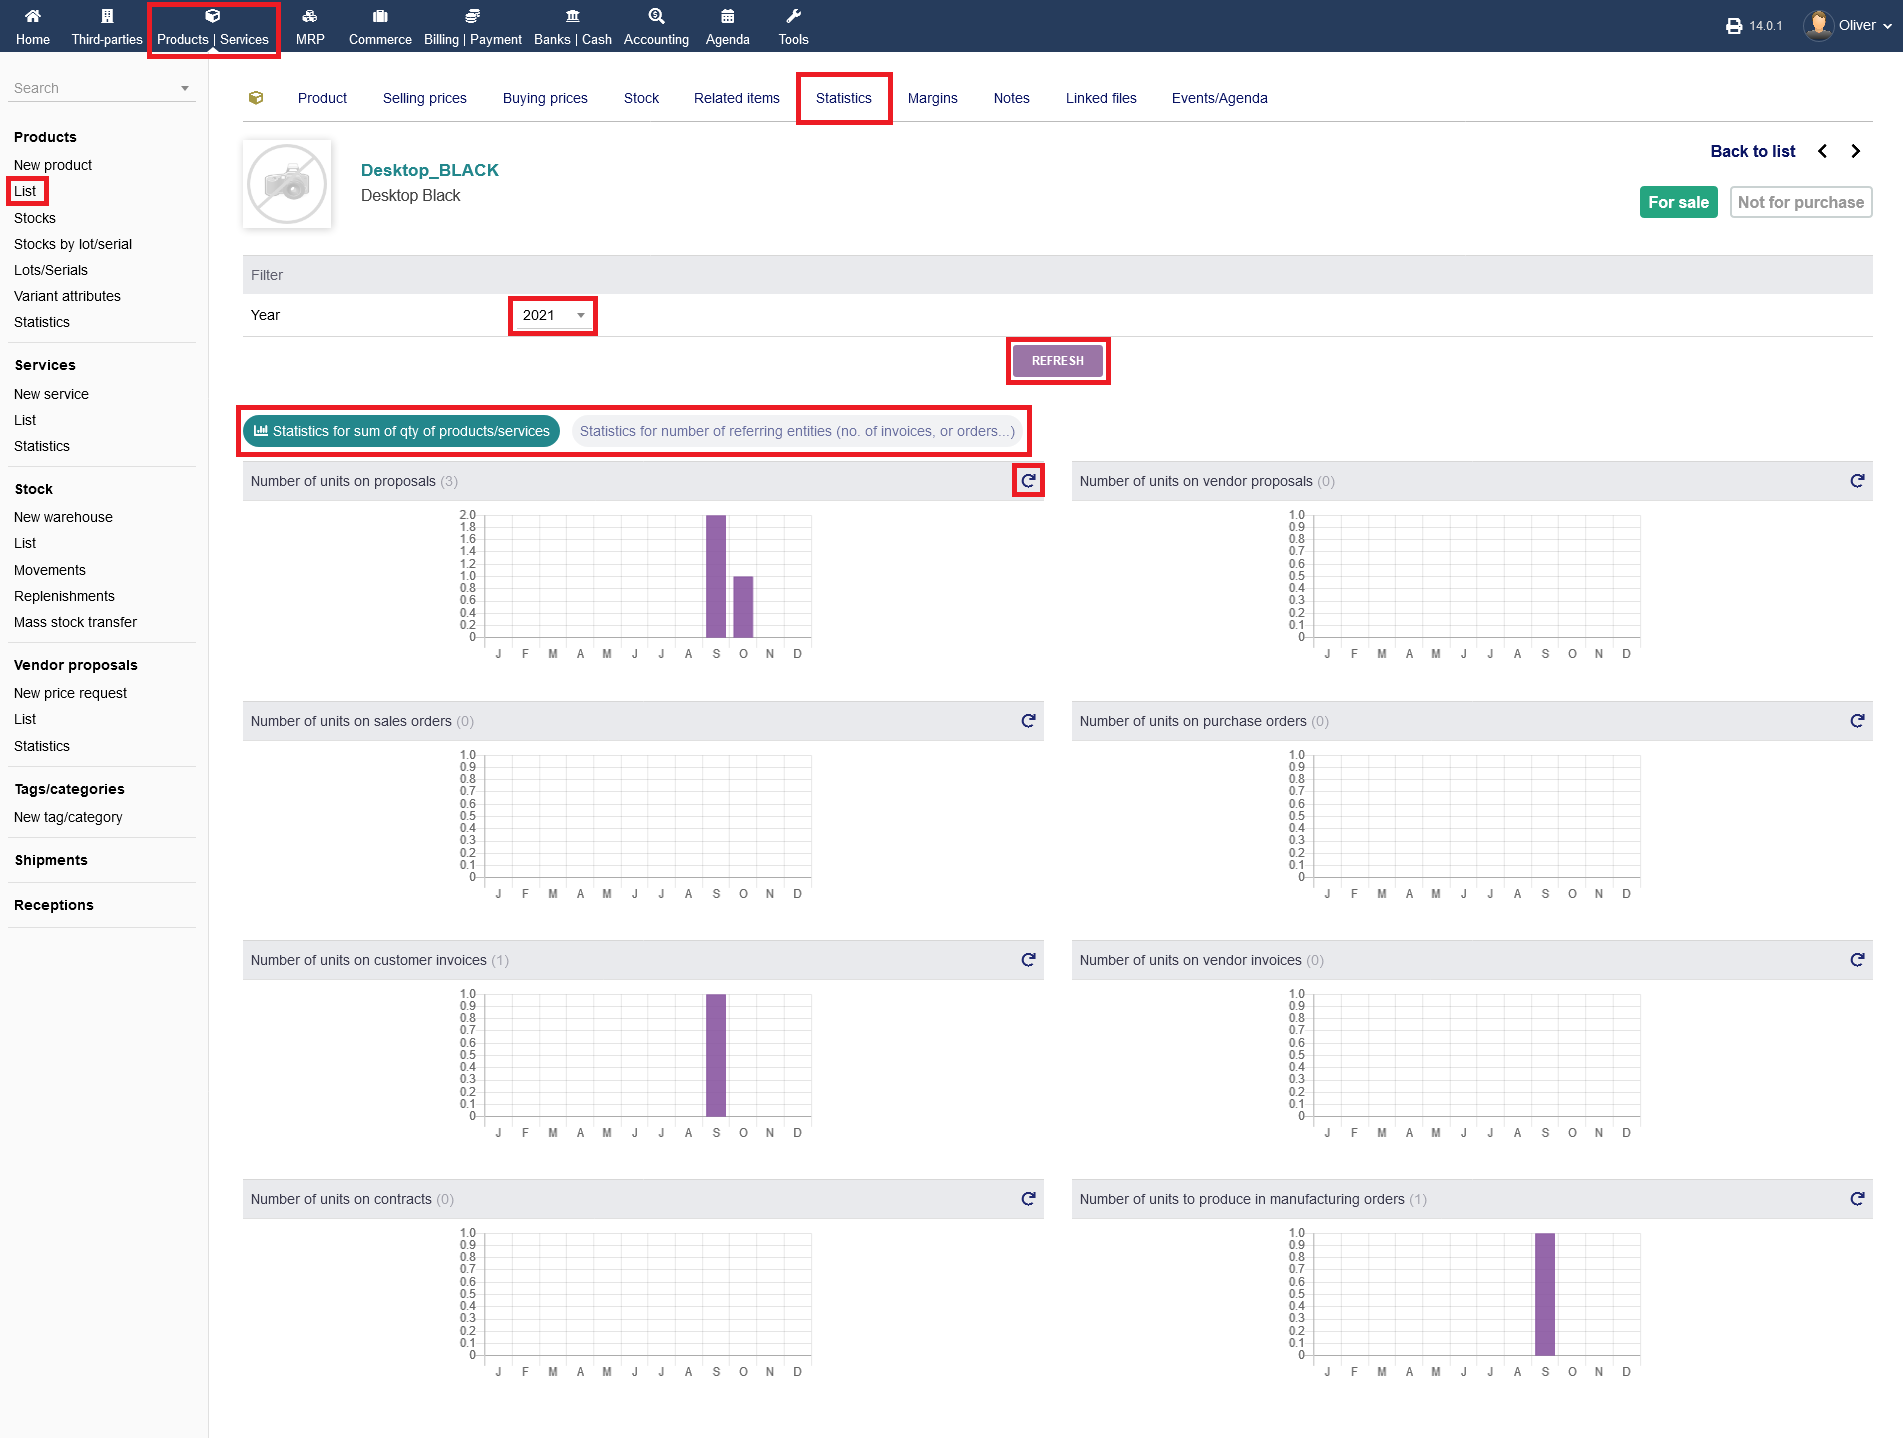
Statistics Tab :
The menu tab "Statistics" presents an overview about different parameters regarding that specific product. You can choose a year and click "REFRESH" to show the results. You can watch the "Statistics for sum of qty of products/services" or the "Statistics for number of referring entities" by clicking on the respective fields. To refresh each chart, click the circular "arrow" button.
Margins Tab :
Under "Margins" you see an overview what margins you got out of a business contact, on a individual customers basis. You can view the invoice or details of the customer by click on the respective field-names.

Notes Tab :
For note taking options, the menu tab "Notes" provides a public (everyone can read) and private (only you/certain users can read) note section. To add a note, click on the "pen" icon.

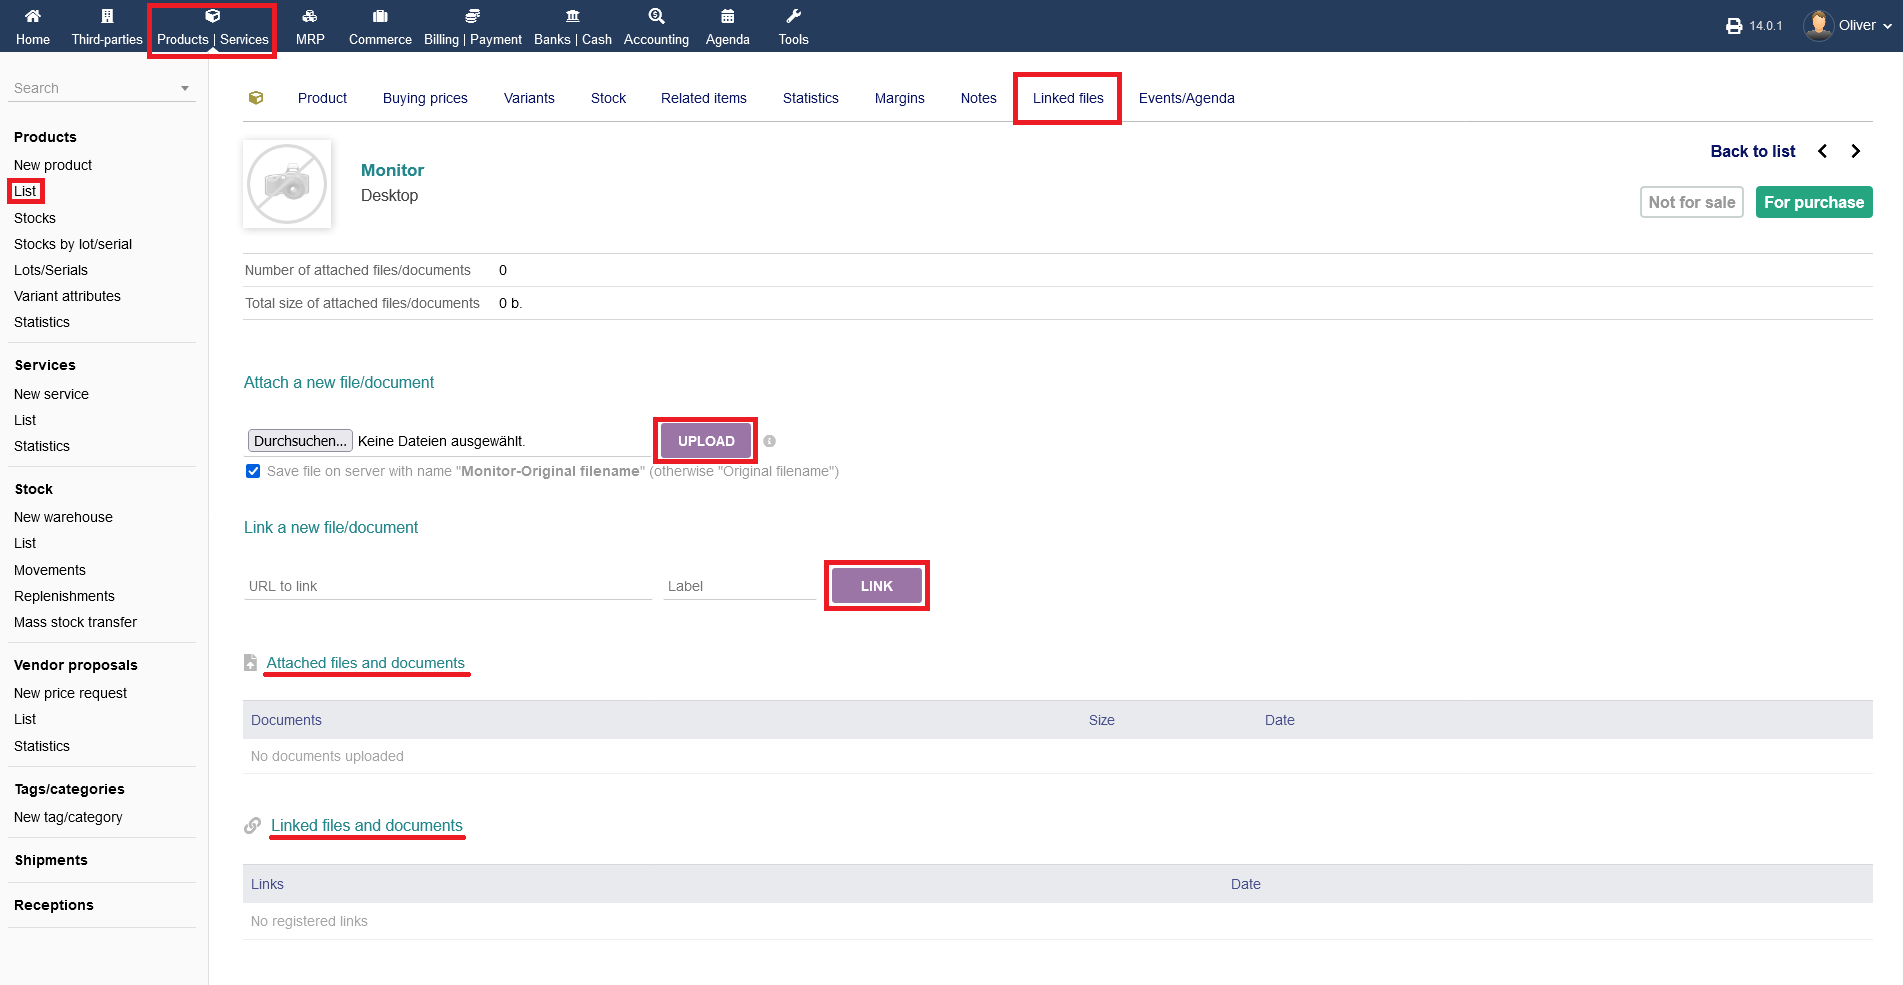
Linked files Tab :
Any linked files or files you want to upload to link with that product you can see or manage under "Linked files". You can upload files from your PC and click "UPLOAD". Alternatively, you can link a file via URL too. Click "LINK" to finish the process. All documents and links will be shown in listings below. Further overviews attached and liked files/documents are granted below under the respective sections.
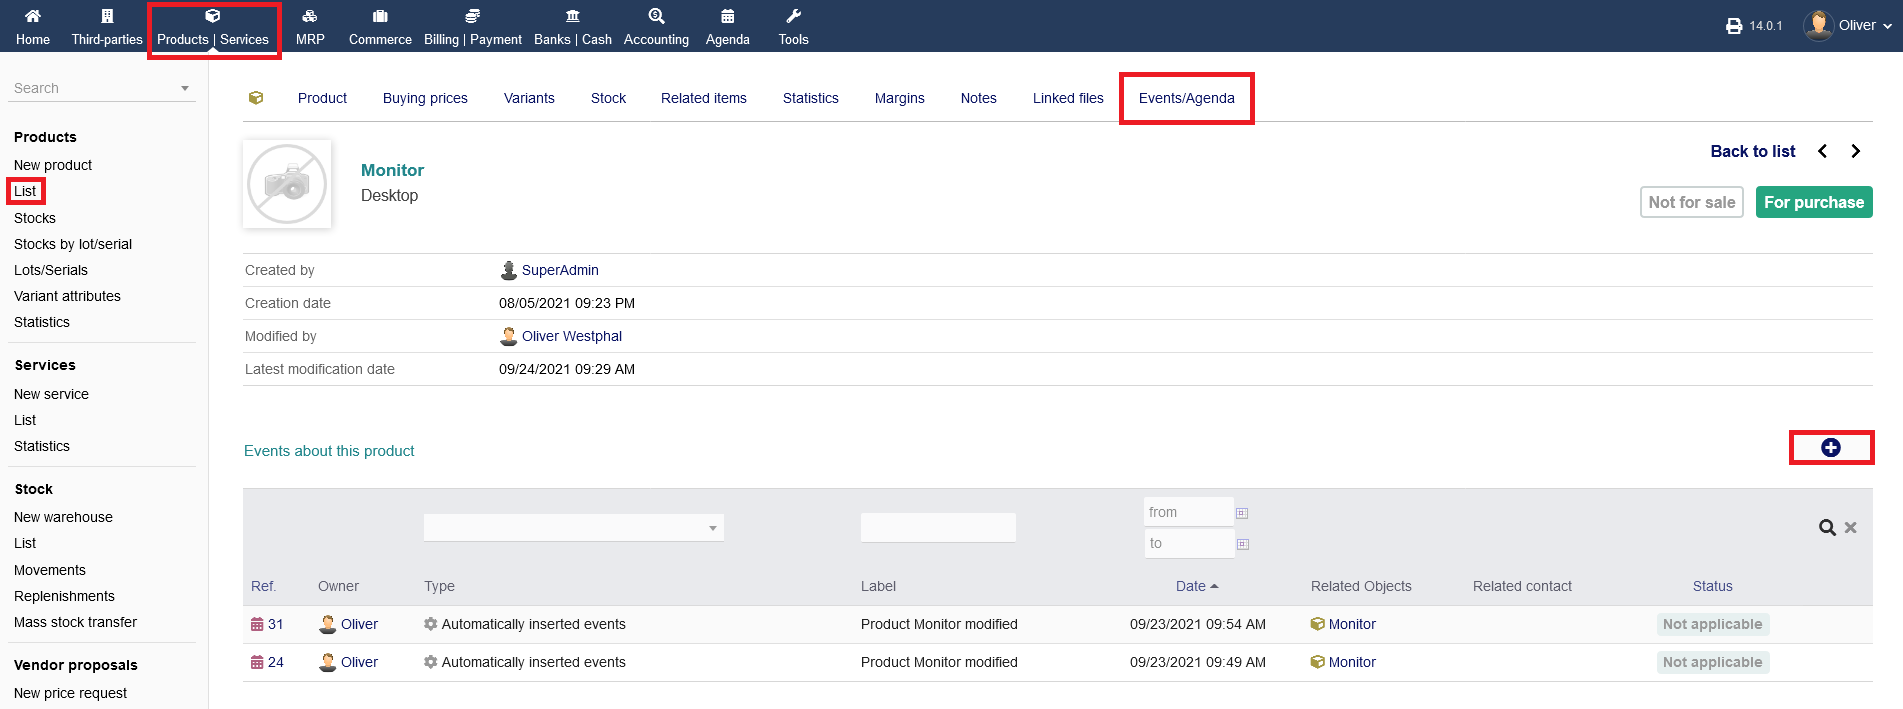
Events/Agenda Tab :
Any events/agendas that happened in relation to that product will be documented under "Events/Agenda". You can add a new event by clicking the "plus" icon, filling out the form with all necessary details in the following mask and click "ADD" to finish.
Product variants :
IntERP offers to setup product variants. Setting up a product variant (e.g. Desktop_BLACK) instead of creating a separate product grants you more functionalities (e.g. setting automatic price differentiation to the parent product on a percentage basis).
Setting up attributes and values
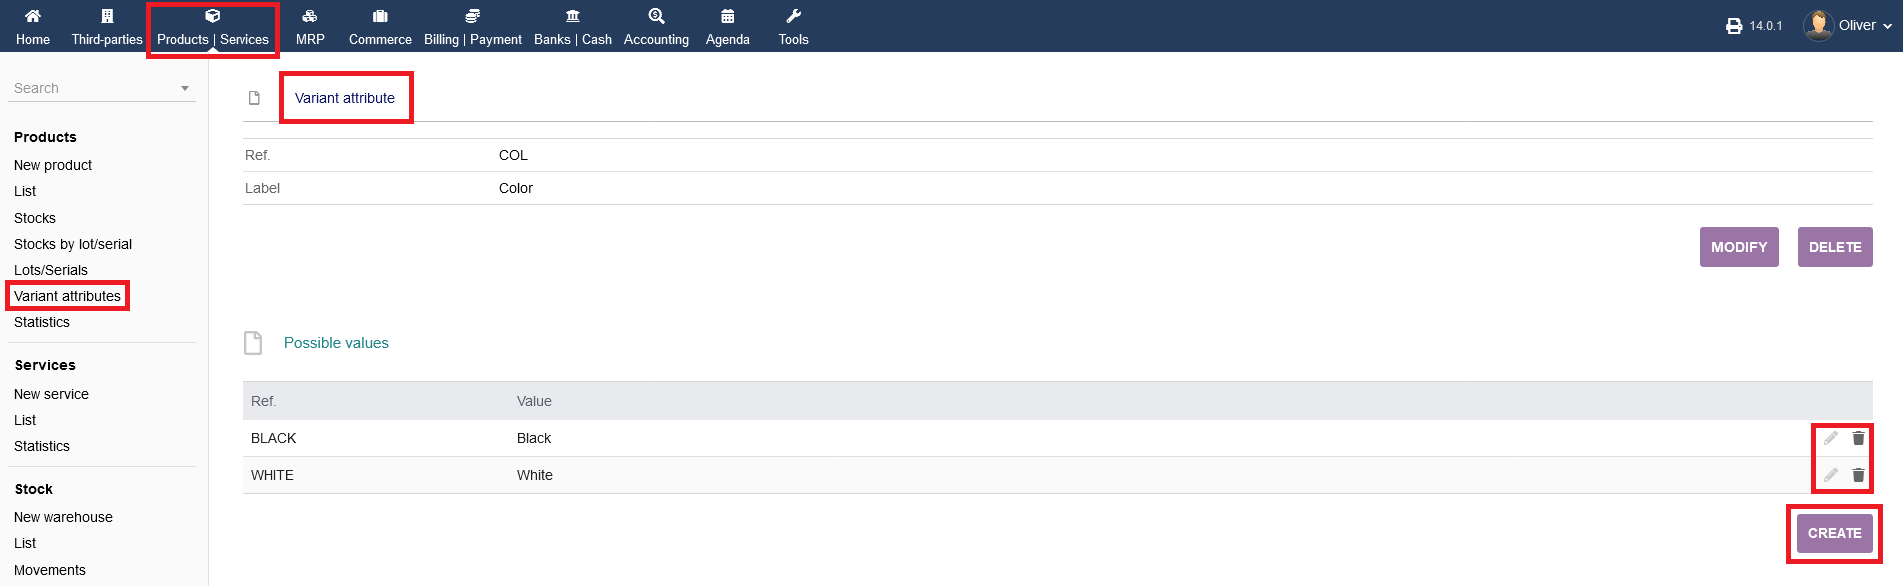
Before creating a new variant to a product, you have to specify an attribute and a value beforehand. To do that, go to "Products/Services -> Products -> Variant attributes". You get an overview of all variants. To add a new variant attribute, click on the "plus" icon. Specify a general reference (e.g. a tree letter short description) and the label as a proper name for the variant. Examples can be color, size, weight, content size etc. When you are done, click "CREATE".

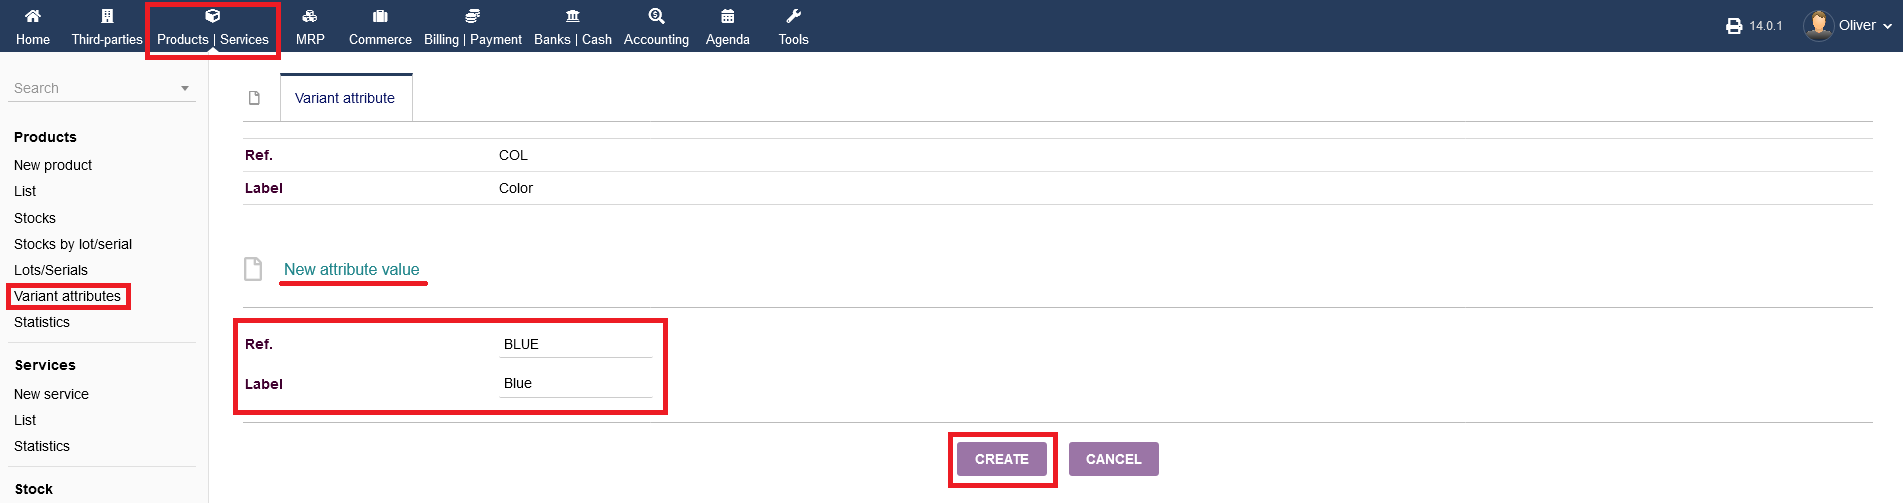
To specify values to these attributes (e.g. white, xxl, 200g etc.), click on "CREATE" under the section "Possible values" (if you don't see that option, you need to select a variant attribute first by going to "Products/Services -> Products -> Variant attributes" and choosing an attribute by clicking on its attribute name). Give a three letter short description as reference and a proper name as a label. Click "CREATE" when you are done. The new value should appear in the listing, where you can edit the value by clicking the "pen" icon or delete the value by clicking the "trash" icon.
Setting up a new product variant
After creating variant attributes, you can setup a variant to a specific product. Go to your product list and click on the product name, you want to setup a variant of. Click on the menu tab "Variants". After that, click on "NEW VARIANT".
Click on the drop down menu for "Variant attribute" and choose the fitting attribute. After that, choose a Value from the respective drop down menu "Value" just below. Click "SELECT COMBINATION" in the end. Additionally, you can choose a reference, a price impact on that variant relative to the parent product by a percentage number and a weight impact. Click "CREATE" to finalize the process.
A new entry should appear in your product listings, stating the product variant with its label, final selling price according to the price impact you setup earlier and its status (for sale/for purchase).