

Stocks, warehouses & lots/serial numbers
intERP lets you manage warehouses, stocks and lots/serial numbers too. Click on "Products/Services -> Stock" to get a birds eye view of your warehouses and any changes regarding the stock of your warehouses.
Warehouses
Warehouses hold your stock of products. You can add new warehouses, make transactions of stock between multiple warehouses, replenish them etc.
Creating warehouses
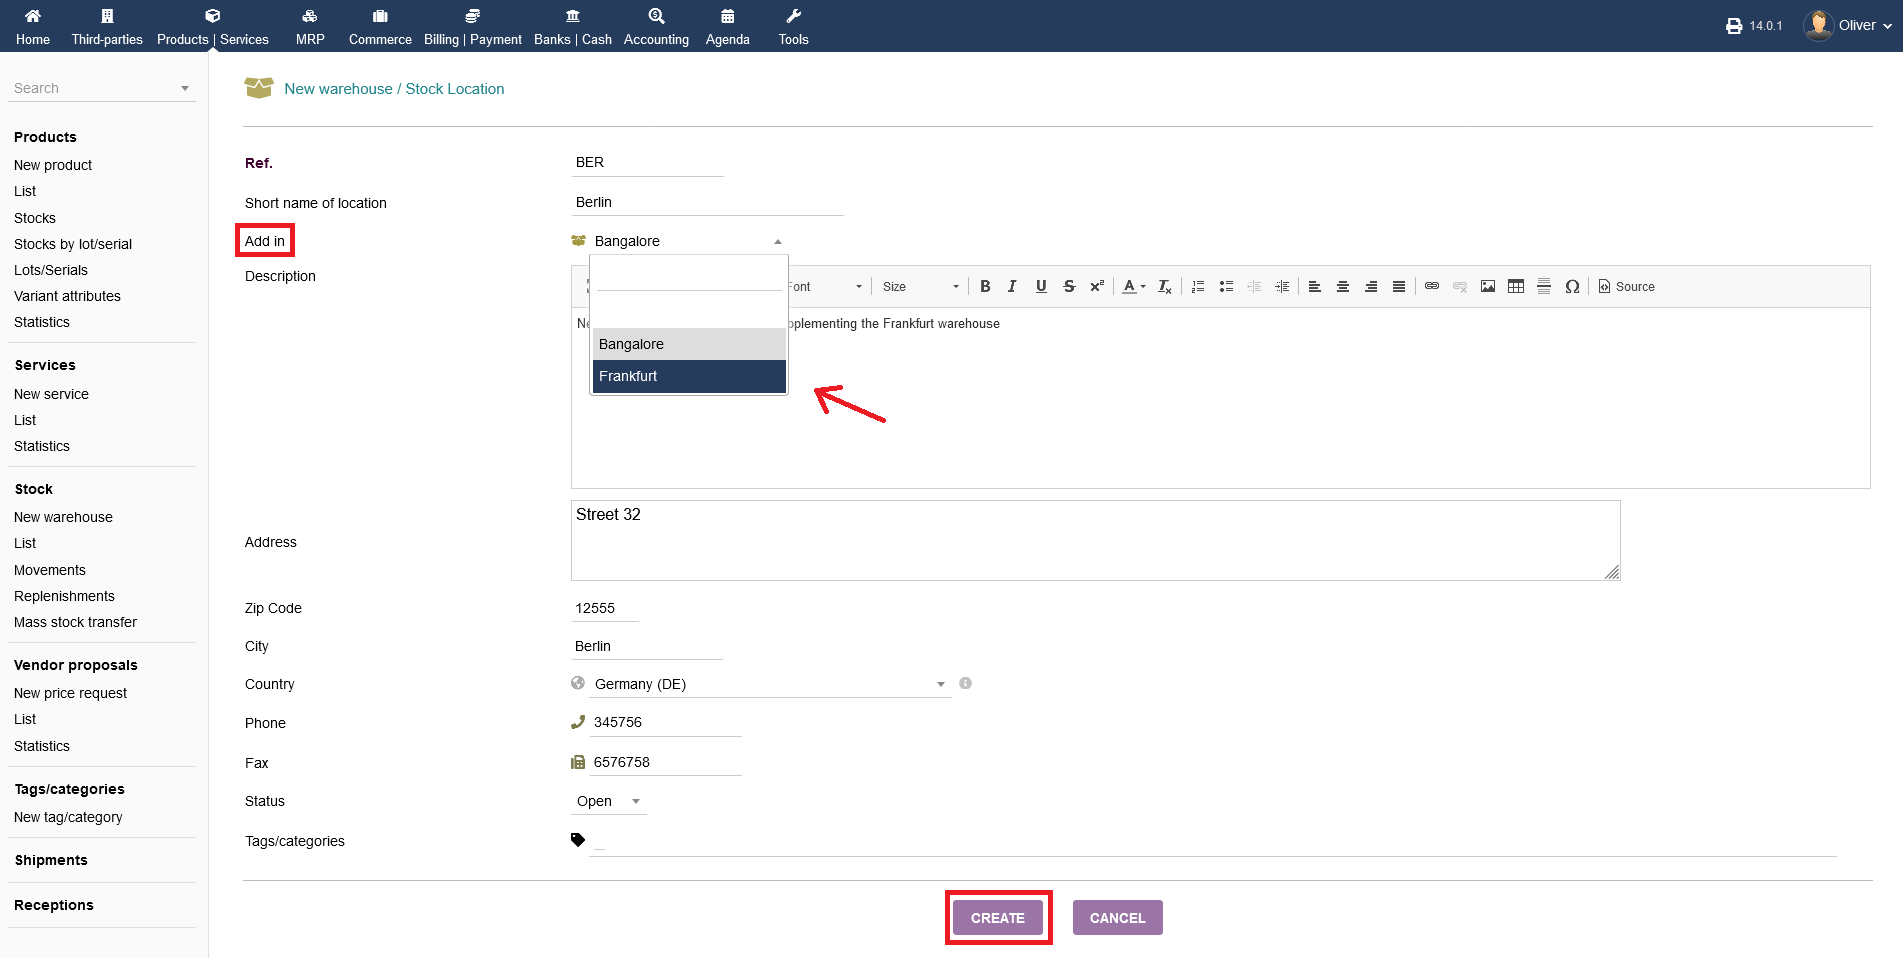
To create a warehouse, click on "Products/Services -> Stock -> New warehouse". Fill out the form, especially the location, address and status (open/closed). If needed, you can add tags to it. Click "CREATE" in the end. Note, that you can "Add in" your new warehouse to an existing warehouse, so those two will be connected. In the screenshot, the Frankfurt warehouse will be the parent warehouse and the Berlin warehouse the respective sub-warehouse.
Editing warehouses & further options
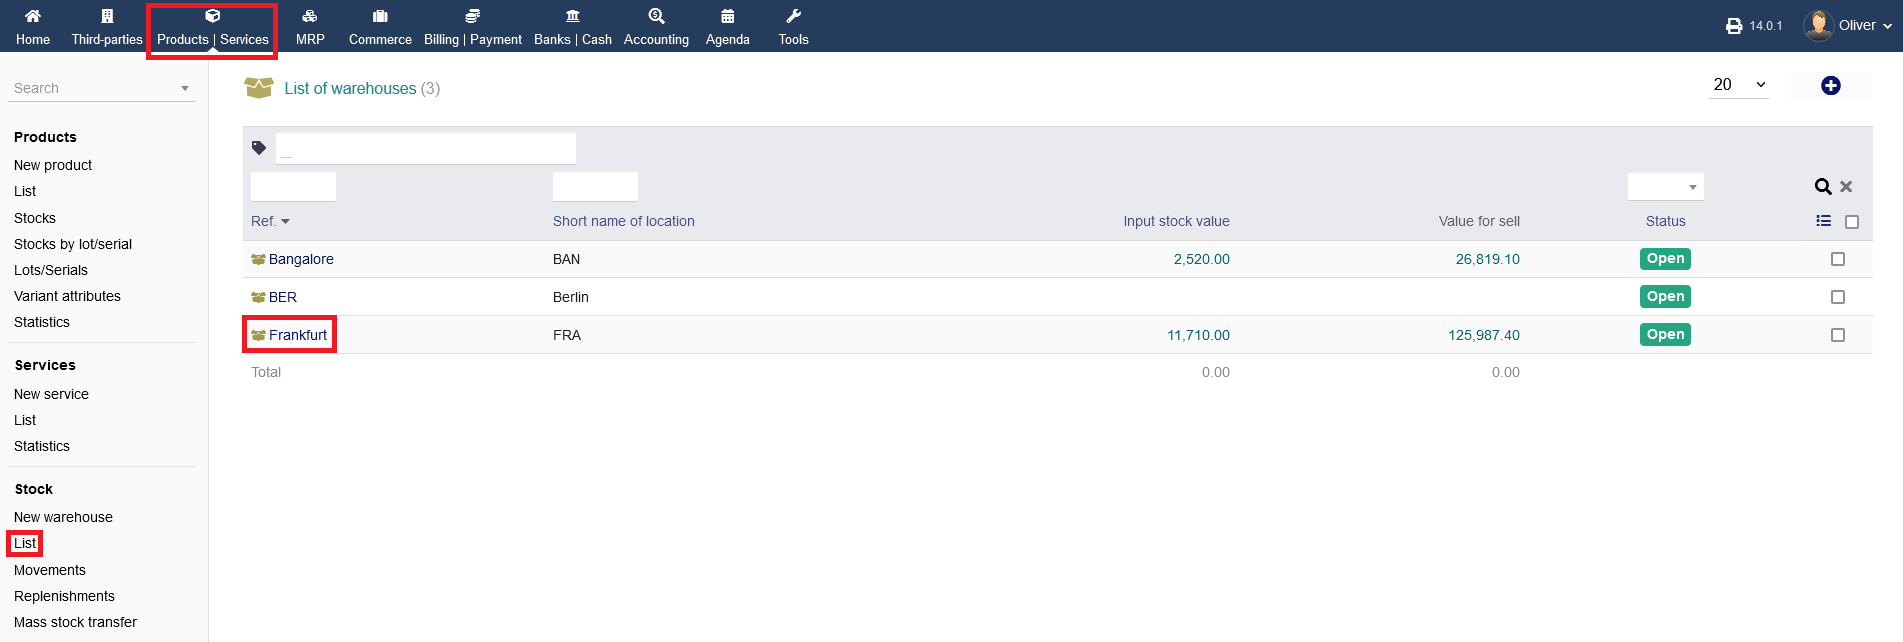
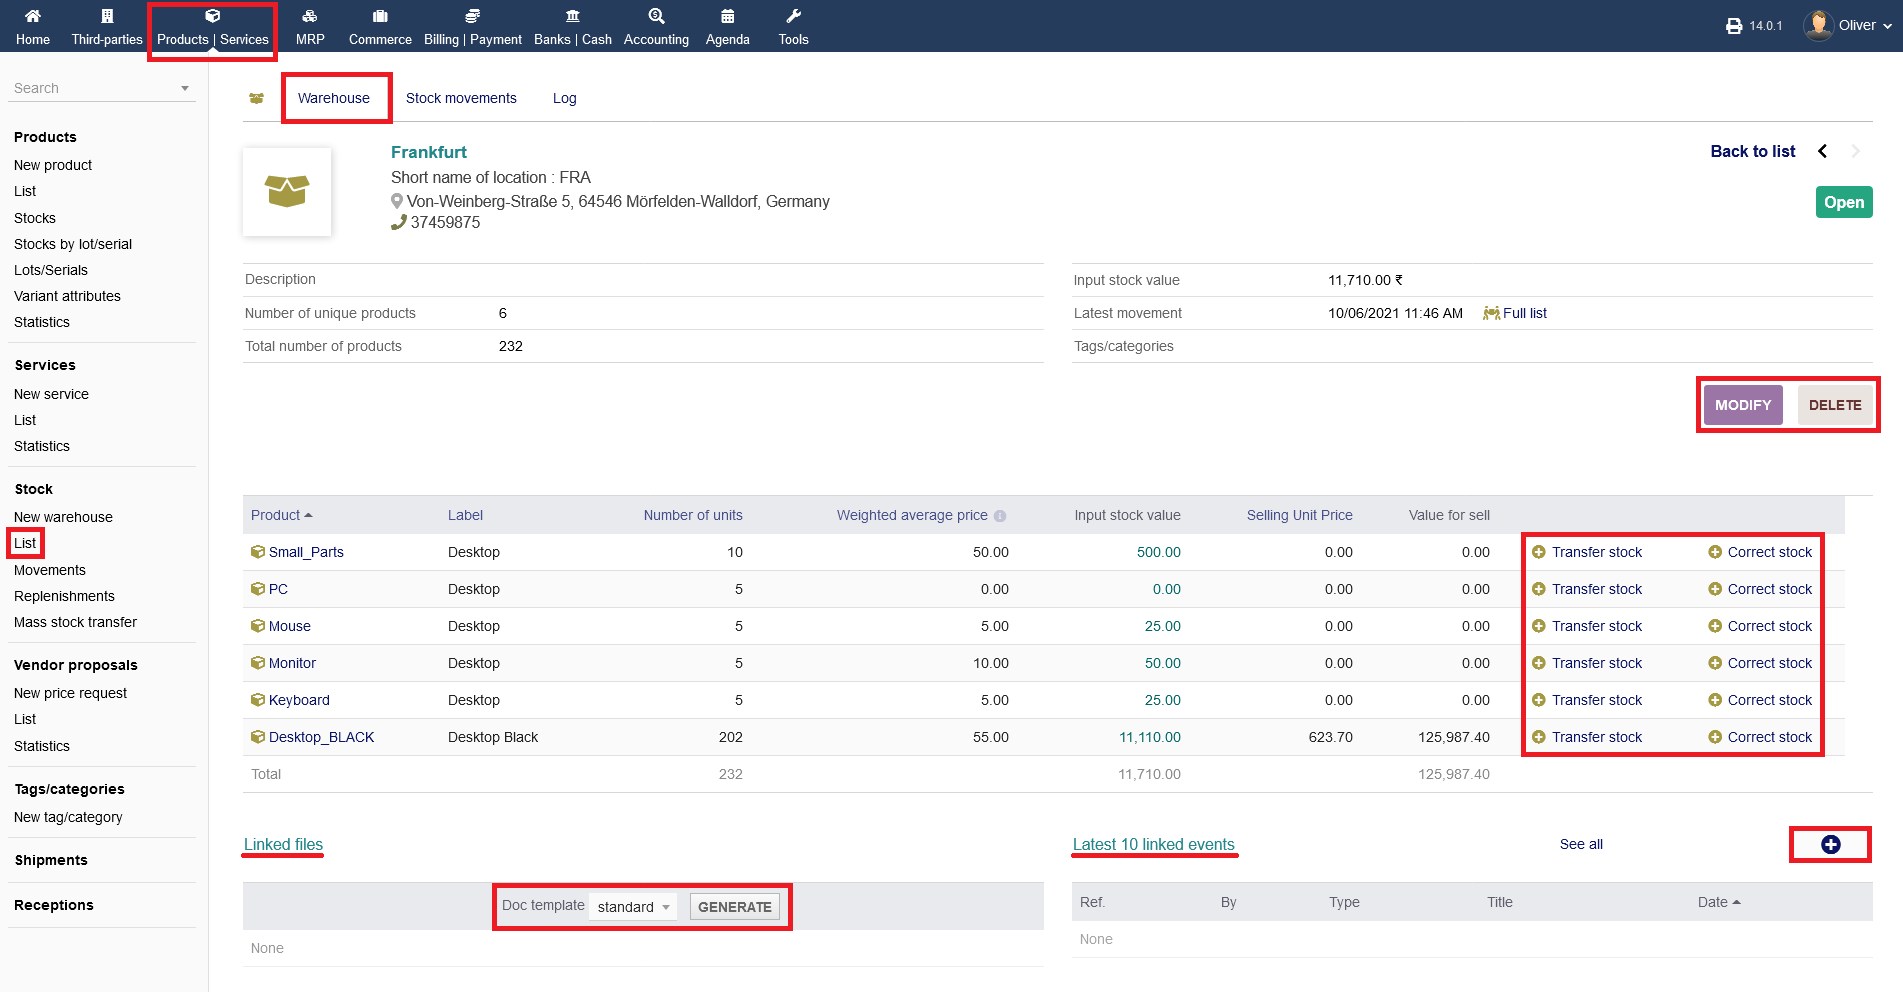
For more options, go to "Products/Services -> Stock -> List" and click on the warehouse name that you want to edit or have more options. To edit any details of your warehouse like name, address etc., click on "MODIFY". You can delete a warehouse entry by clicking on "DELETE". Below, you will see any products, their stock/available units and values. You can choose to transfer or correct stock by clicking the respective "plus" icon. Lastly, you will have listings of any linked files regarding that warehouse and the 10 latest events that are associated with that warehouse. To create a new file, choose a template from the drop down menu and click "GENERATE". To add a new event, click the "plus" icon. Fill out all necessary details in the following form and click on "ADD".
Stocks
Go to "Products/Services -> Stock -> List", choose a warehouse by clicking on the name (see screenshot before).
Stock correction and stock transfers
To perform stock movements, you can also manage that under the menu tab "Stock movements" alternatively. You are able to sort the listing by different parameters by using the fields about the listing. Click the "magnifier" icon to perform the sorting.
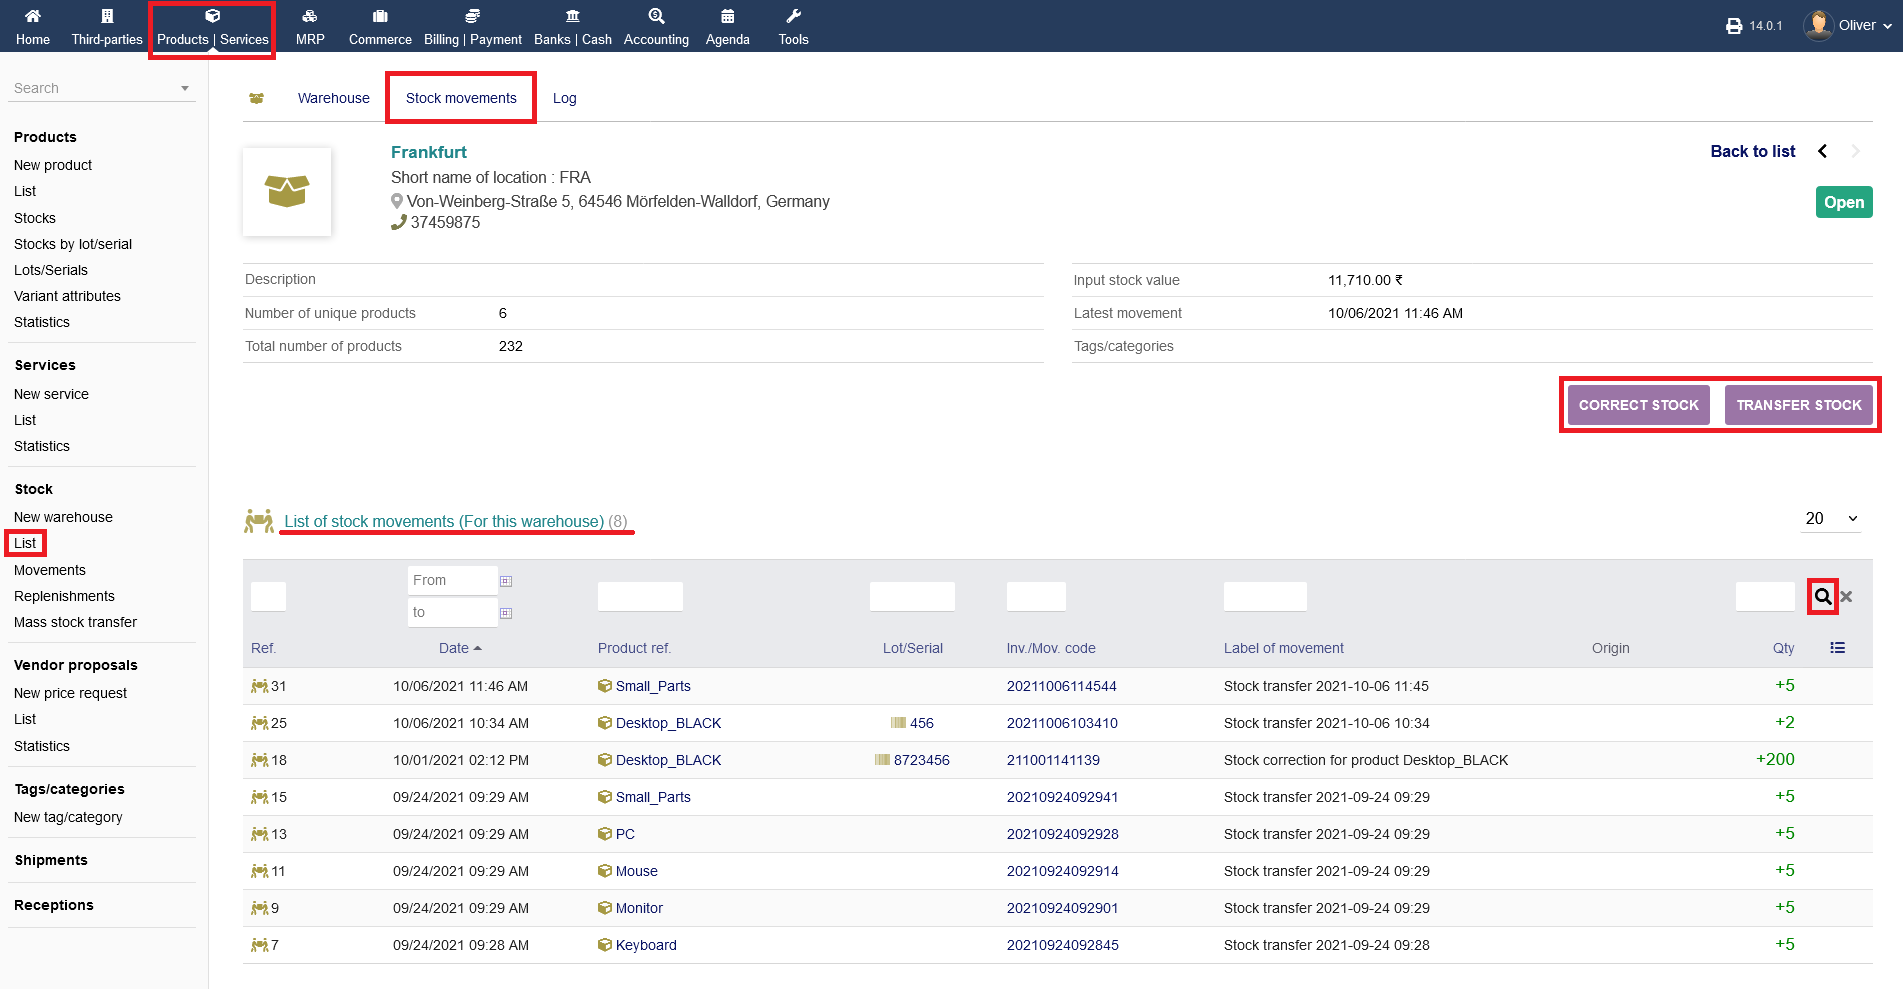
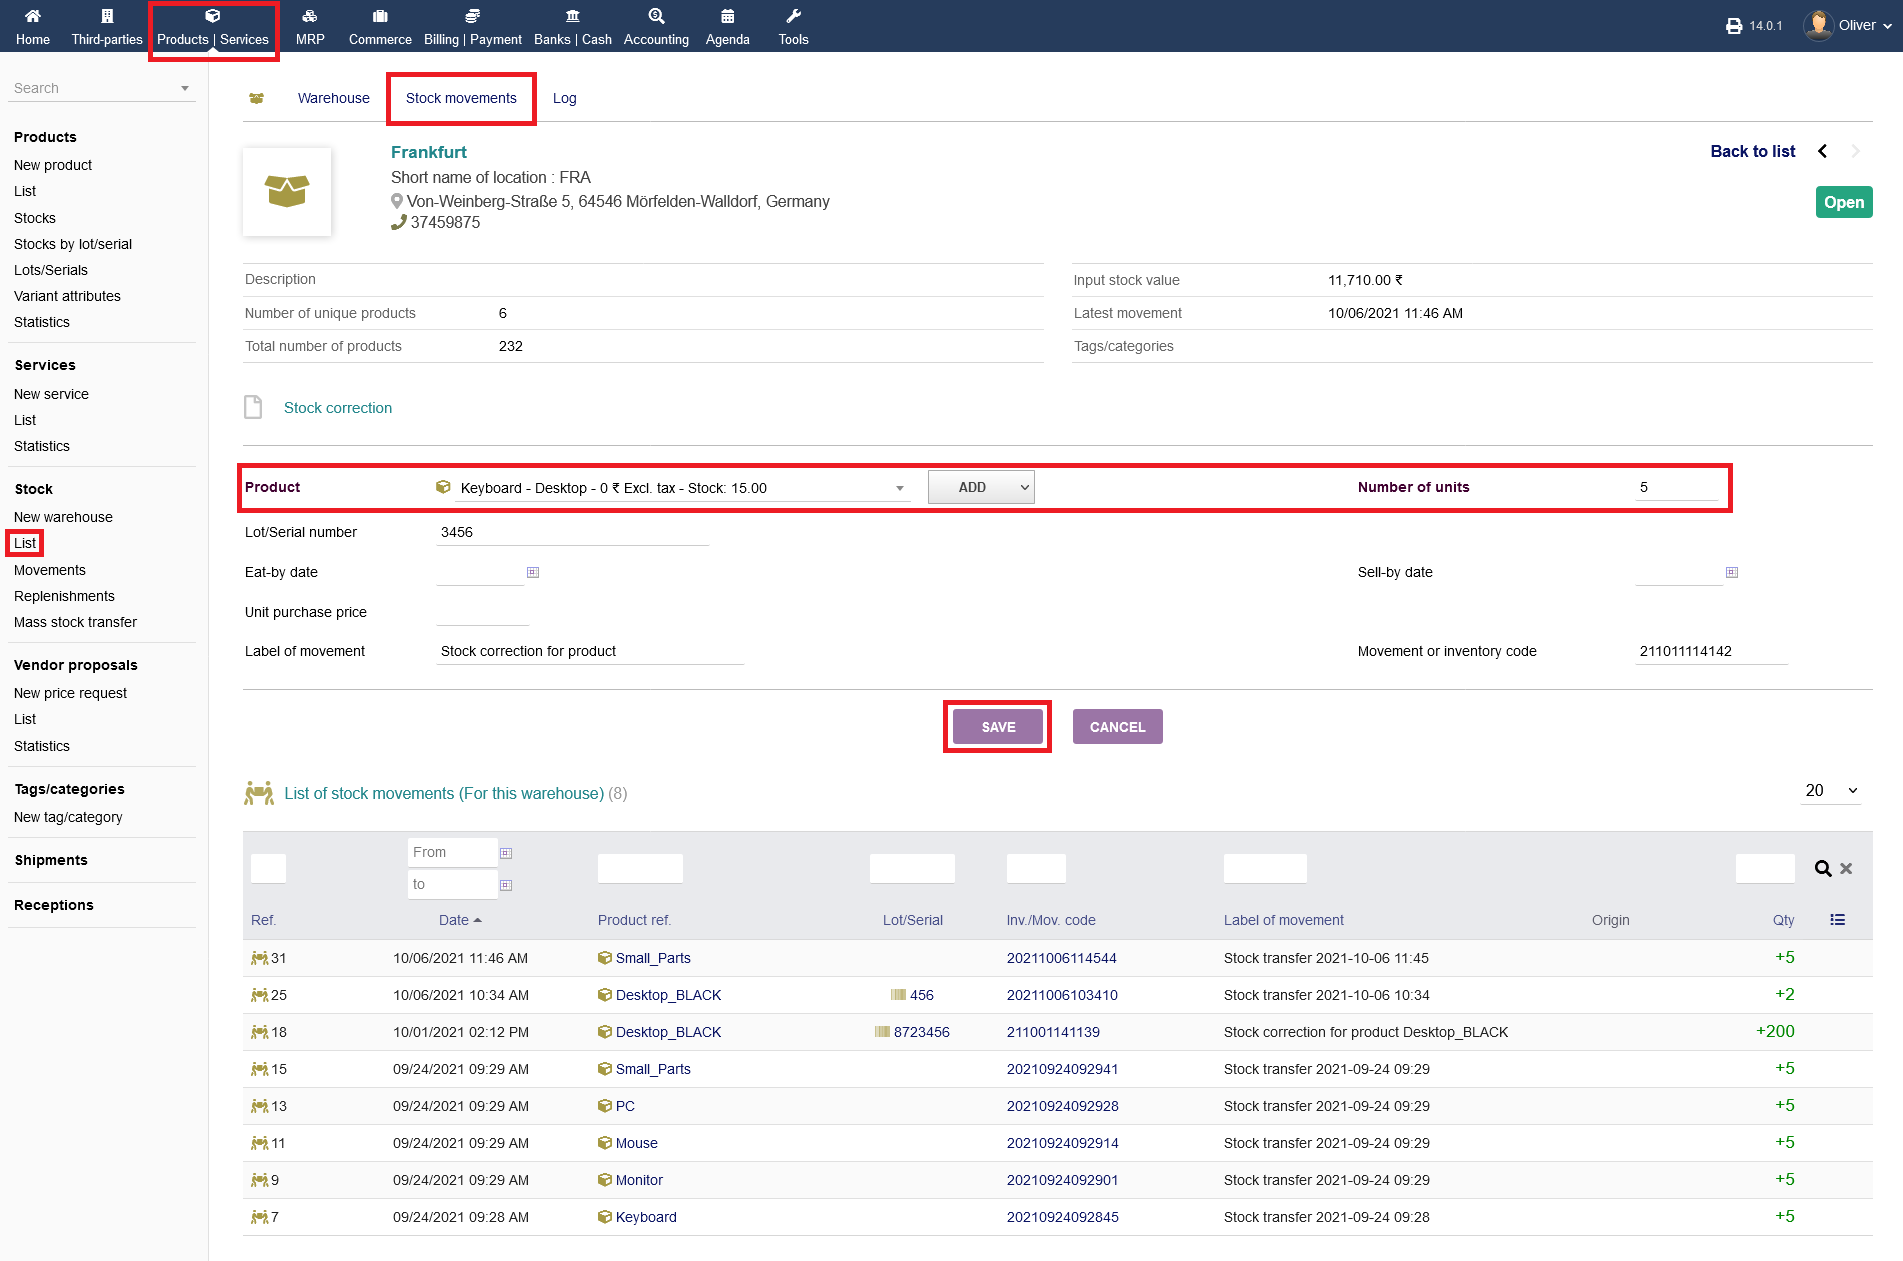
Click on "CORRECT STOCK" to perform any stock corrections, if there is a difference that needs to be balanced out. Choose a product first from the drop down menu under "Product", then whether you want to "add" or "delete" number of units, the amount under "number of units" and any additional information that you think is needed additionally. On the bottom, you find a listing of all stock movements for that specific warehouse. Click on "SAVE" to perform the correction. You are able to sort the listing by different parameters by using the fields about the listing. Click the "magnifier" icon to perform the sorting.
To transfer stock between warehouses, click on "TRANSFER STOCK". Choose a product first from the drop down menu under "Product", then the target warehouse from the respective drop down menu under "Target warehouse", the amount under "number of units" and any additional information that you think is needed additionally. Click on "SAVE" to perform the correction. Note, that you can transfer stock between two warehouses only. You cannot transfer stock from one warehouse to two or more warehouses at the same time. On the bottom, you find a listing of all stock movements for that specific warehouse. You are able to sort the listing by different parameters by using the fields about the listing. Click the "magnifier" icon to perform the sorting.

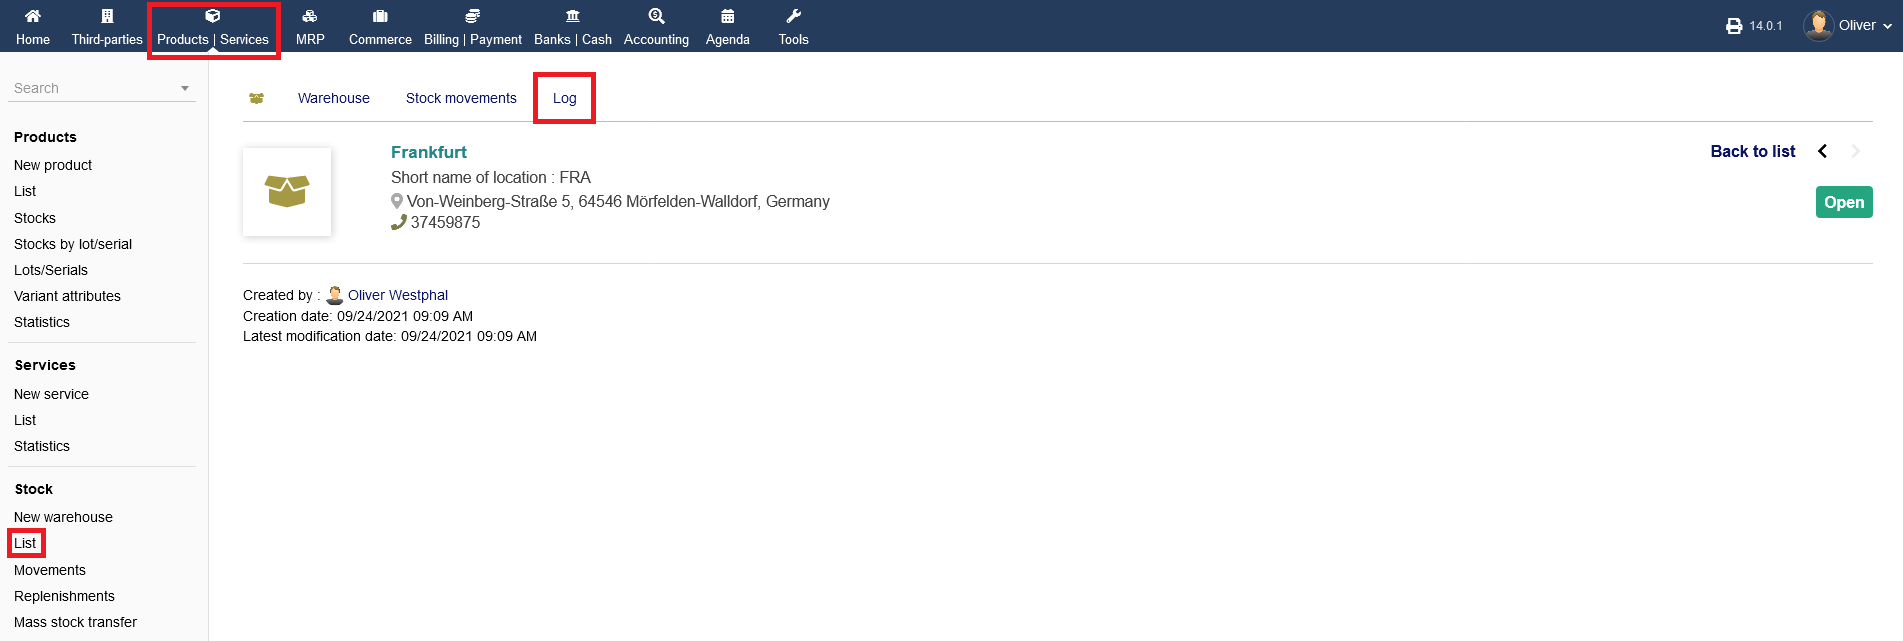
Finally, you can have a log overview under the menu tab "Log". This does not provide any extra functionality.
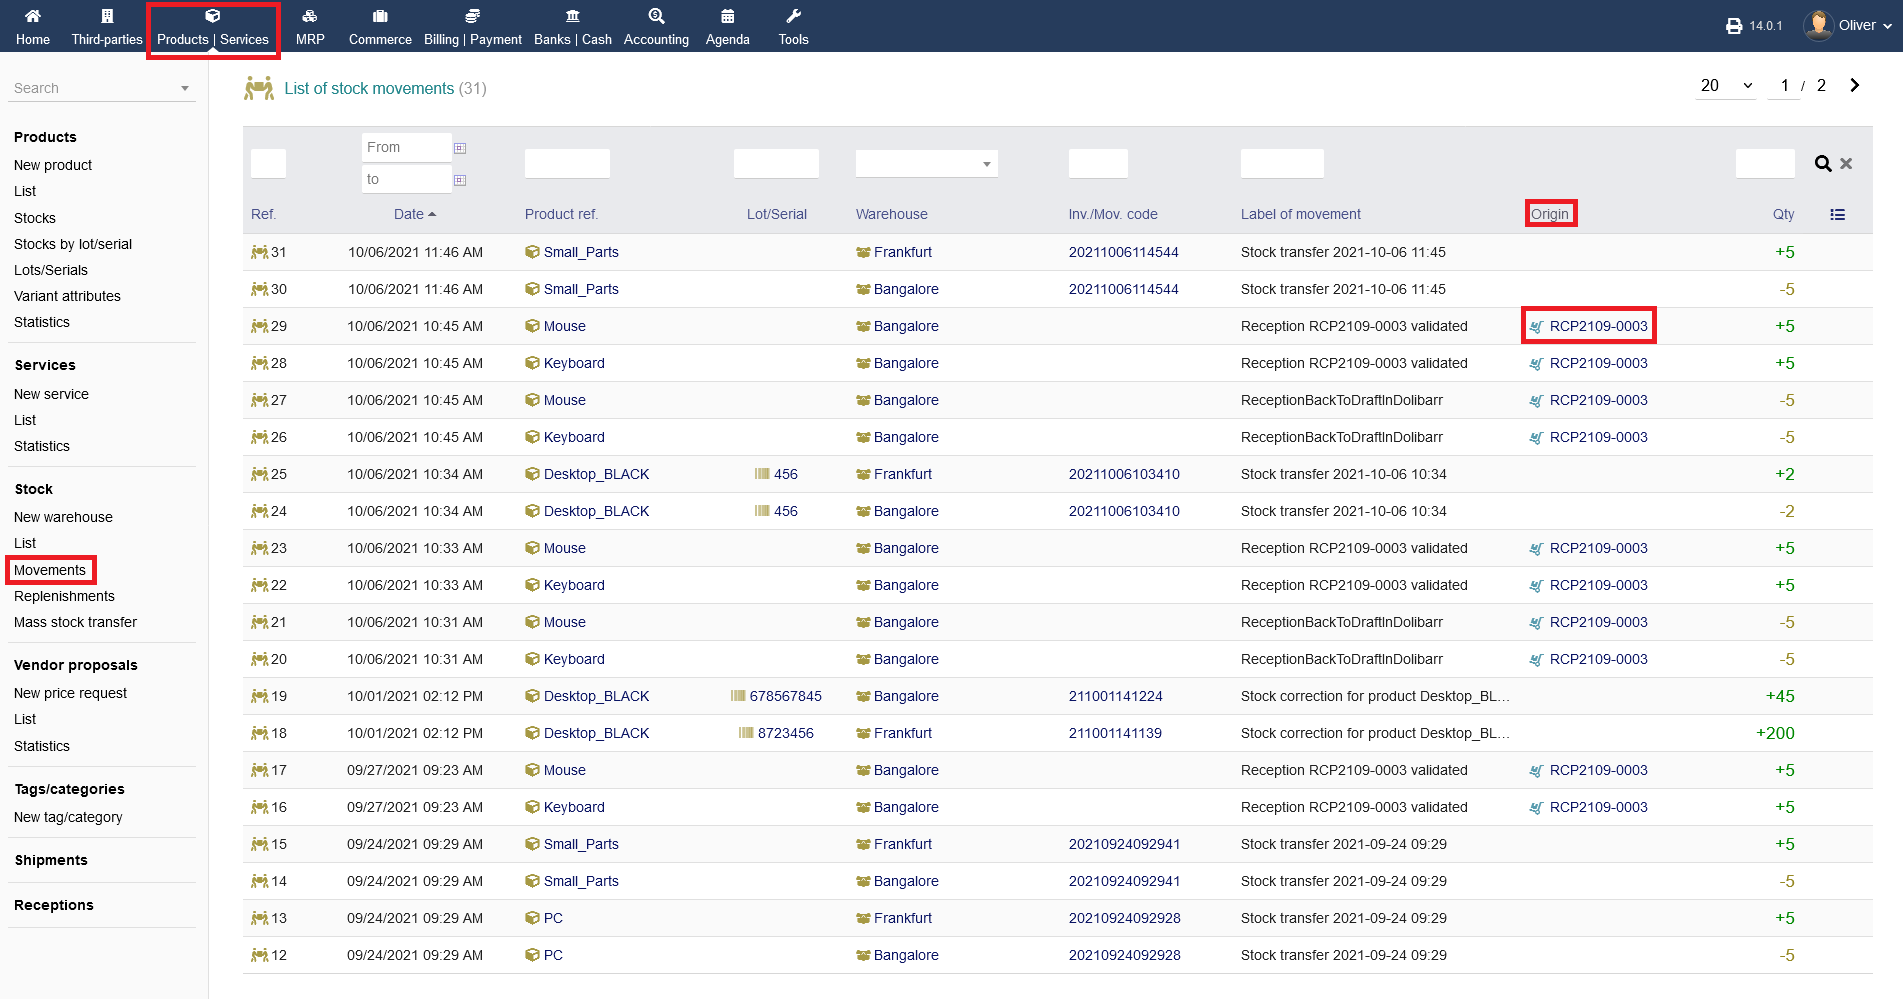
Note: You can have a birds eye view of your total stock related movements by clicking on "Products/Services -> Stock -> Movements". You are able to sort the listing by different parameters by using the fields about the listing. Click the "magnifier" icon to perform the sorting.
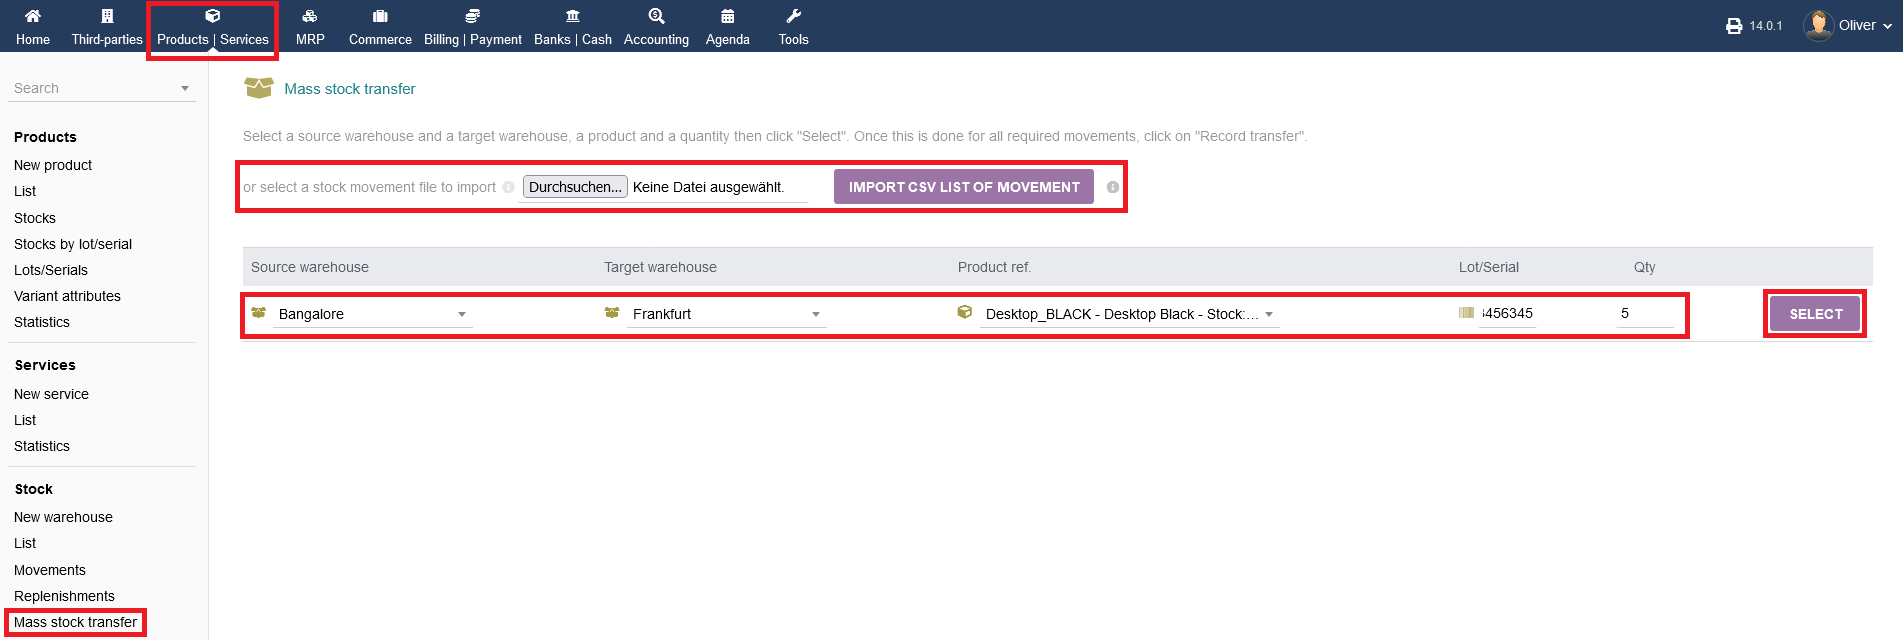
Other than that, you can perform a stock transfer via the menu "Products/Services -> Stock -> Mass stock transfer" as well. Here you can quickly choose the source and target warehouse, the product, the lot/serial number and the quantity by the respective drop down menus or fields. Click "SELECT" when done. A movement/inventory code as well as a label of movement will be created automatically. Confirm by clicking "RECORD TRANSFER". You can import a local CSV file, containing a list of movements as well, if you want to upload a backup of a former movements history. Choose a file accordingly and click "IMPORT CSV LIST OF MOVEMENT" to finalize.
Stock movements
Under "Products/Services -> Stock -> List", + warehouse name + menu tab "Stock movements" (see above) and under "Products/Services -> Stock -> Movements", you can open the reception details of a transaction. Click on the respective reception number of a product under the section "Origin". In the following, the "Reception card" of that transfer will be opened. If the reception is still pending, you have to validate the reception by clicking on "VALIDATE". If that reception entry is not needed anymore, click "DELETE".
The overview screen is changing after confirming the validation. Click on "MODIFY" to go back to the pre-validation state. You can send an E-Mail with the reception details by clicking on "SEND BY EMAIL". Furthermore, you can generate an invoice by clicking on "CREATE INVOICE". Lastly, you can set the transaction as payed/billed by clicking "CLASSIFY BILLED". You can undo that in the next step by clicking "CLASSIFY UNBILLED". As always, you have the option to delete that transaction card by clicking "DELETE". On the bottom, you do see any linked files, especially the reception PDF under the section "Linked files". You can create additional files by choosing the type by template from the drop down menu and by clicking "GENERATE" in the end. Any related objects, especially purchase orders, will be shown below, showing off the status and a link to the respective purchase under the section "Related Objects". You can unlink that entry by clicking the "chain" icon.
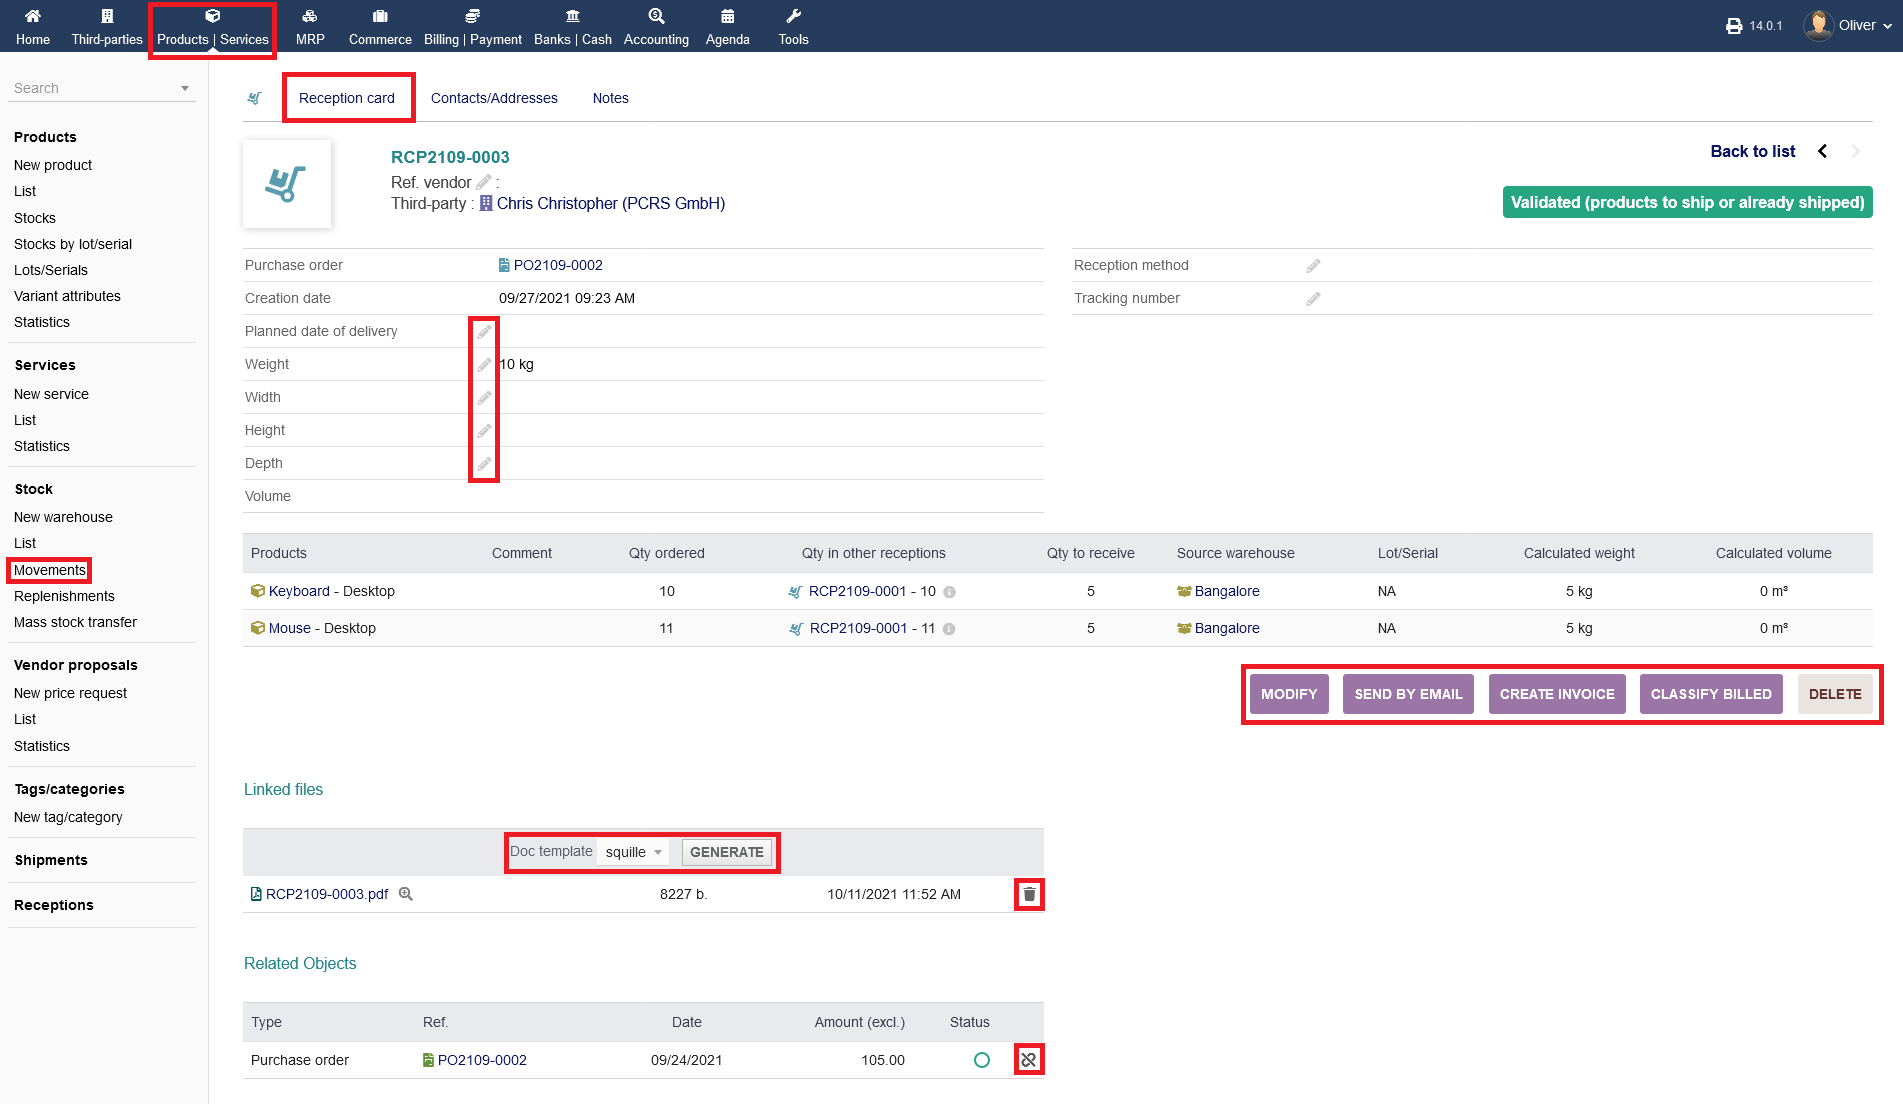
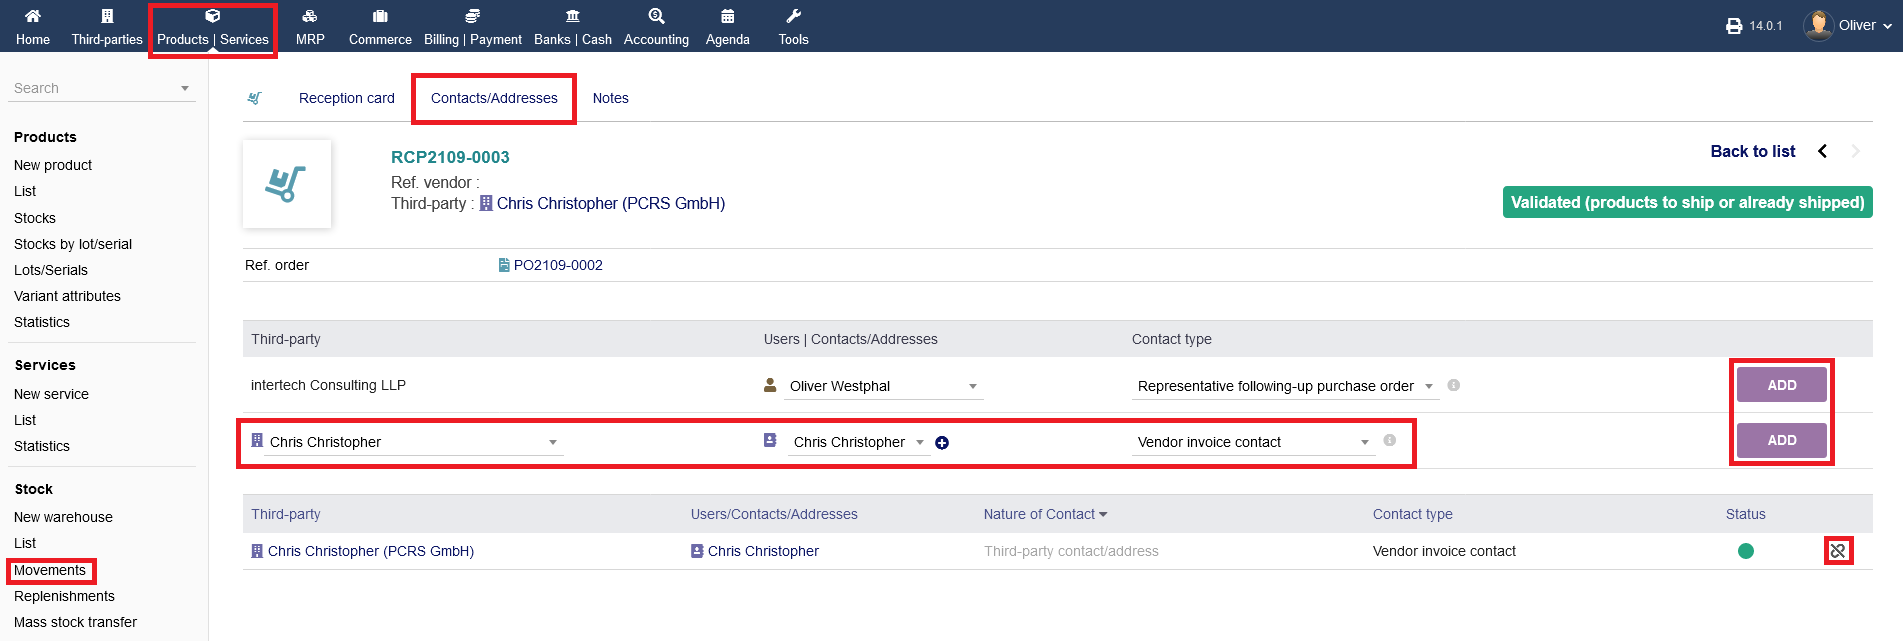
Further contacts/addresses can be added to the reception under the menu tab "Contacts/Addresses". Choose a third party from the listing and click "ADD" on the right side. The added contact will show in a new listing below. You can unlink that entry by clicking the "chain" icon.
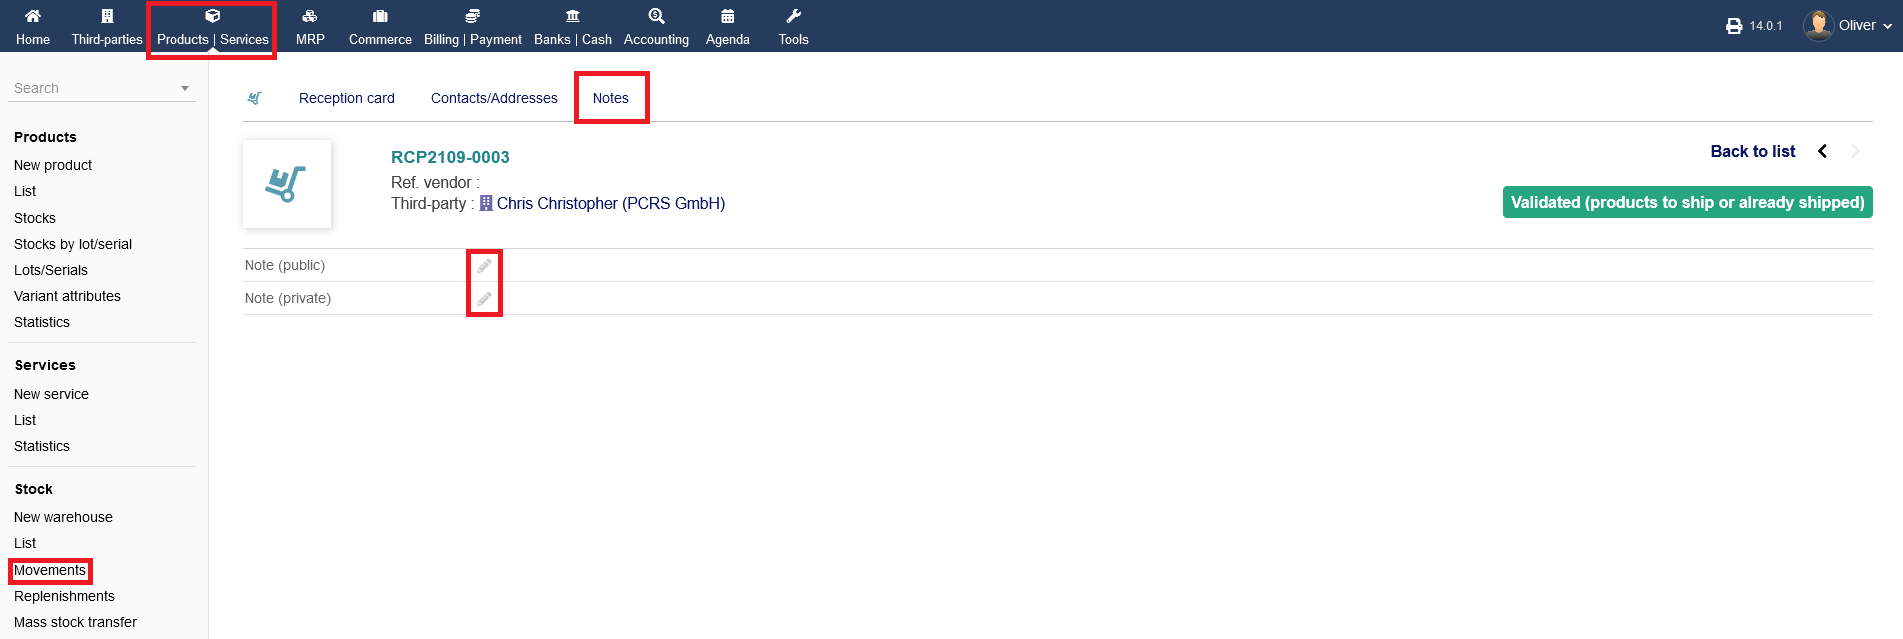
Any public or private notes can be added under the menu tab "Notes".
Stock replenishments
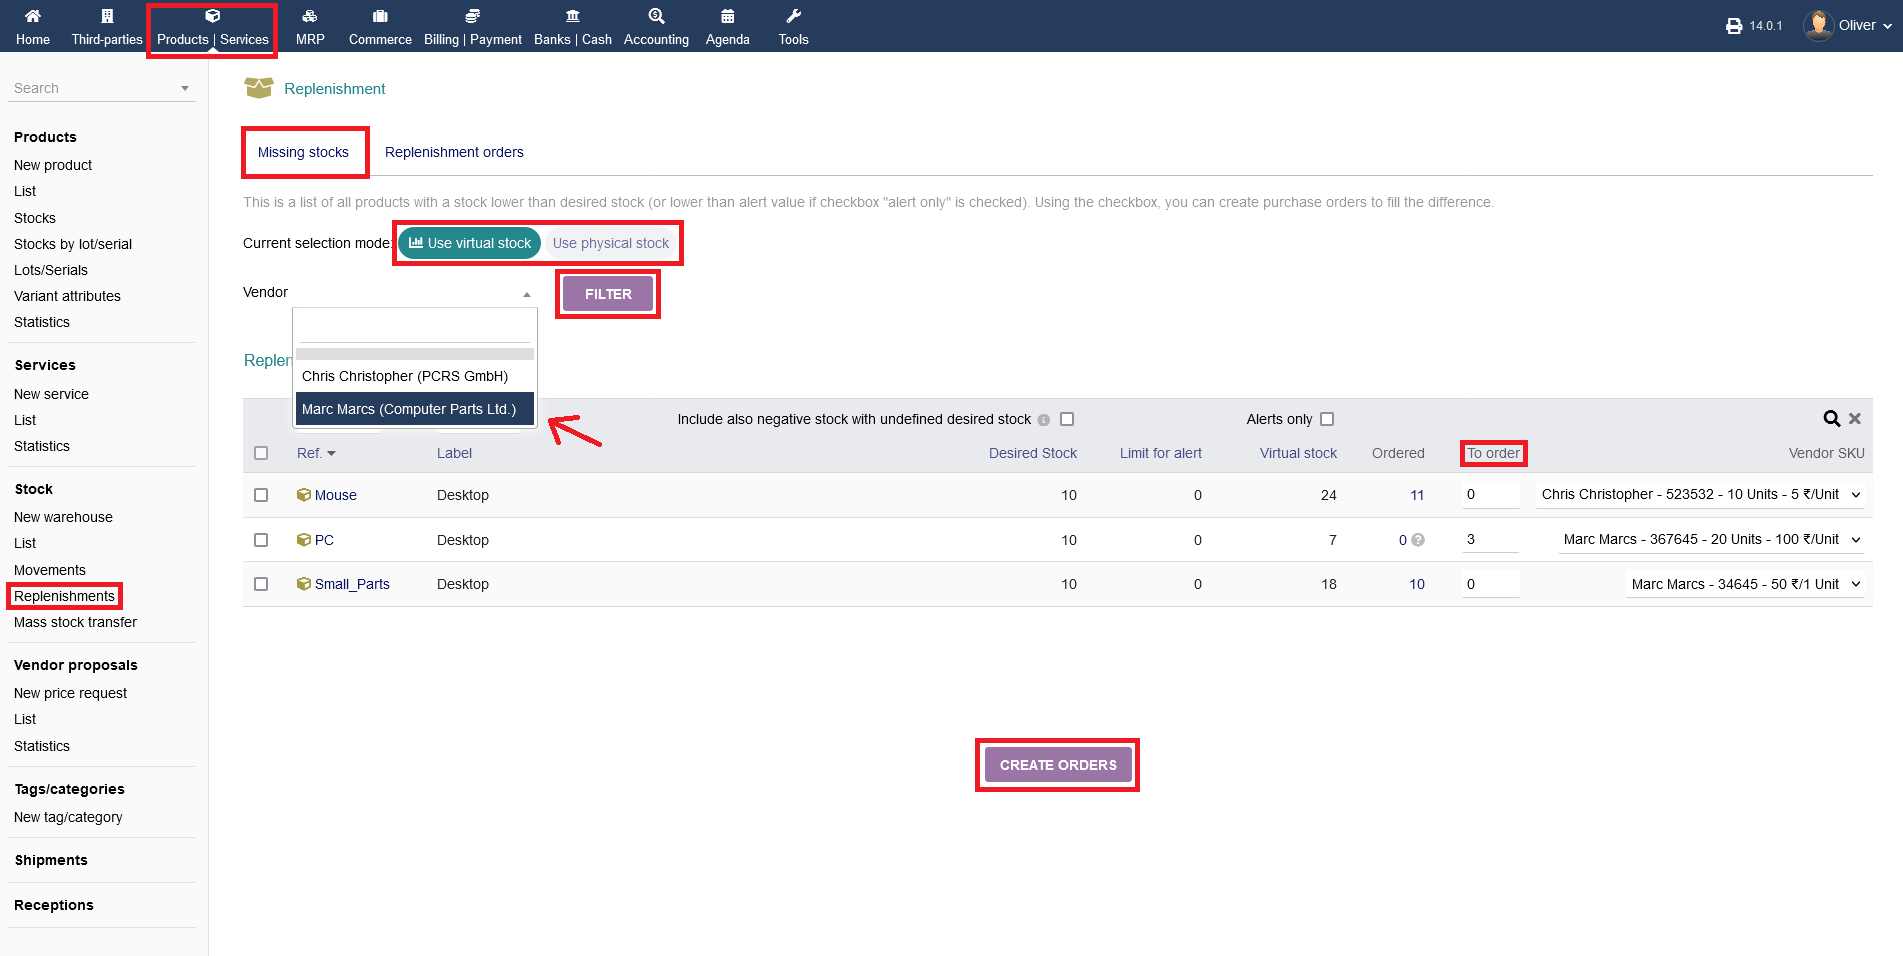
To replenish your stock, go to "Products/Services -> Stock -> Replenishments".
Under the menu tab "Missing stocks" you see a list of all products with a stock lower than desired. Using the checkbox, you can create purchase orders to fill the difference. On the top you can select two viewing models, "Use virtual stock" for virtual stock and "Use physical stock" for physical stock. Under that, you can filter the replenishment listing for specific vendors. Choose a vendor from the drop down menu and click "FILTER". More details are found under the replenishment listing. To order additional units, specify a number of units under the section "To order" click "CREATE ORDERS" to finish the process (you are not finally ordering from the vendor, only creating an order entry in your system). Note, that your orders are created for all shown products. You cannot select just one product from that listing, since the listing assumes that you are low regarding those products and you want to order all of them.
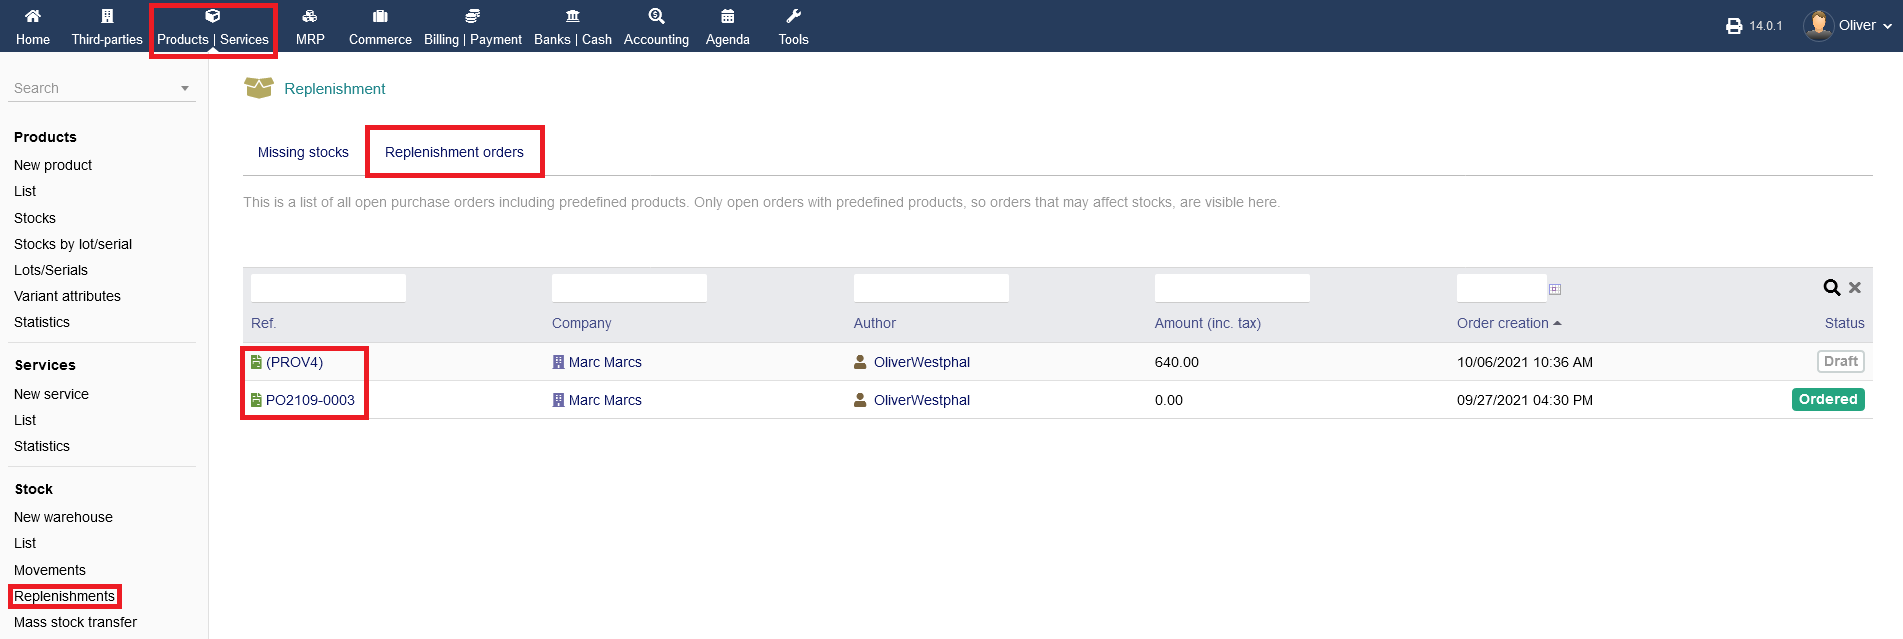
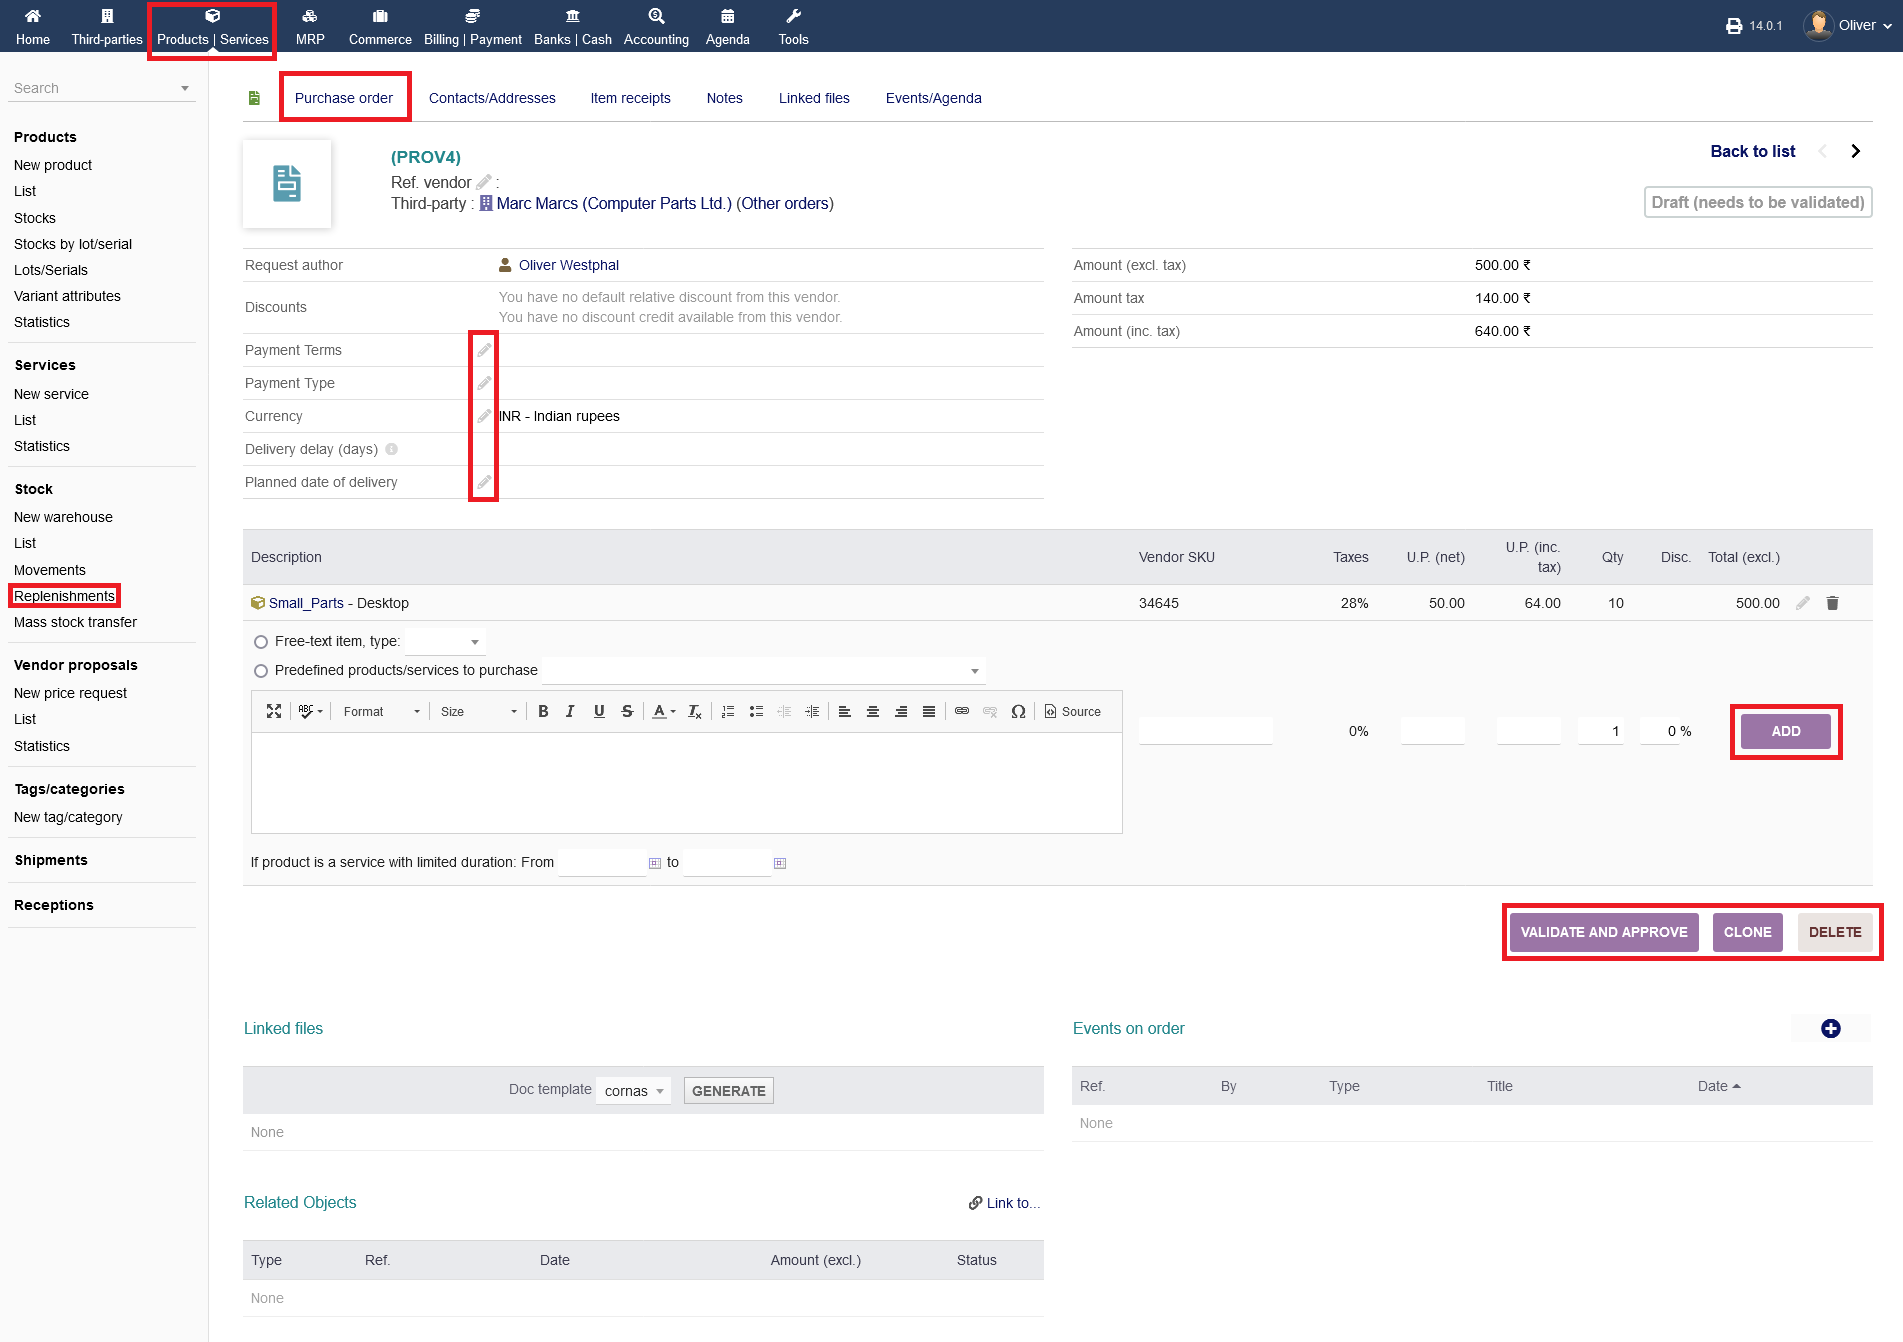
Under the menu tab "Replenishment orders" is a list of all open purchase orders including predefined products. Only open orders with predefined products, so orders that may affect stocks, are visible. You can see their status on the right side. To carry on with an order, that you created following the steps above, click on the reference name on the left side. In the following screen, you can add additional products. To finish the process, click "VALIDATE AND APPROVE". Optionally, you can clone that order, if you want to create a second one that may be similar by clicking on "CLONE". Finally you can delete by clicking "DELETE".
As covered multiple times before, you have additional sections for overviews/options on the bottom regarding "Linked files", "Events on order" and "Related Objects". On the menu tab "Contact/Addresses" you can choose from different third parties again (as already covered previously). Click "ADD". Any receipts will be shown under the menu tab "Item receipts". The tab menus "Notes", "Linked files" and "Events/Agenda" are the same as explained previous articles. To edit details like payment type, payment terms etc., click the "pen" icon.
Lots/serial numbers
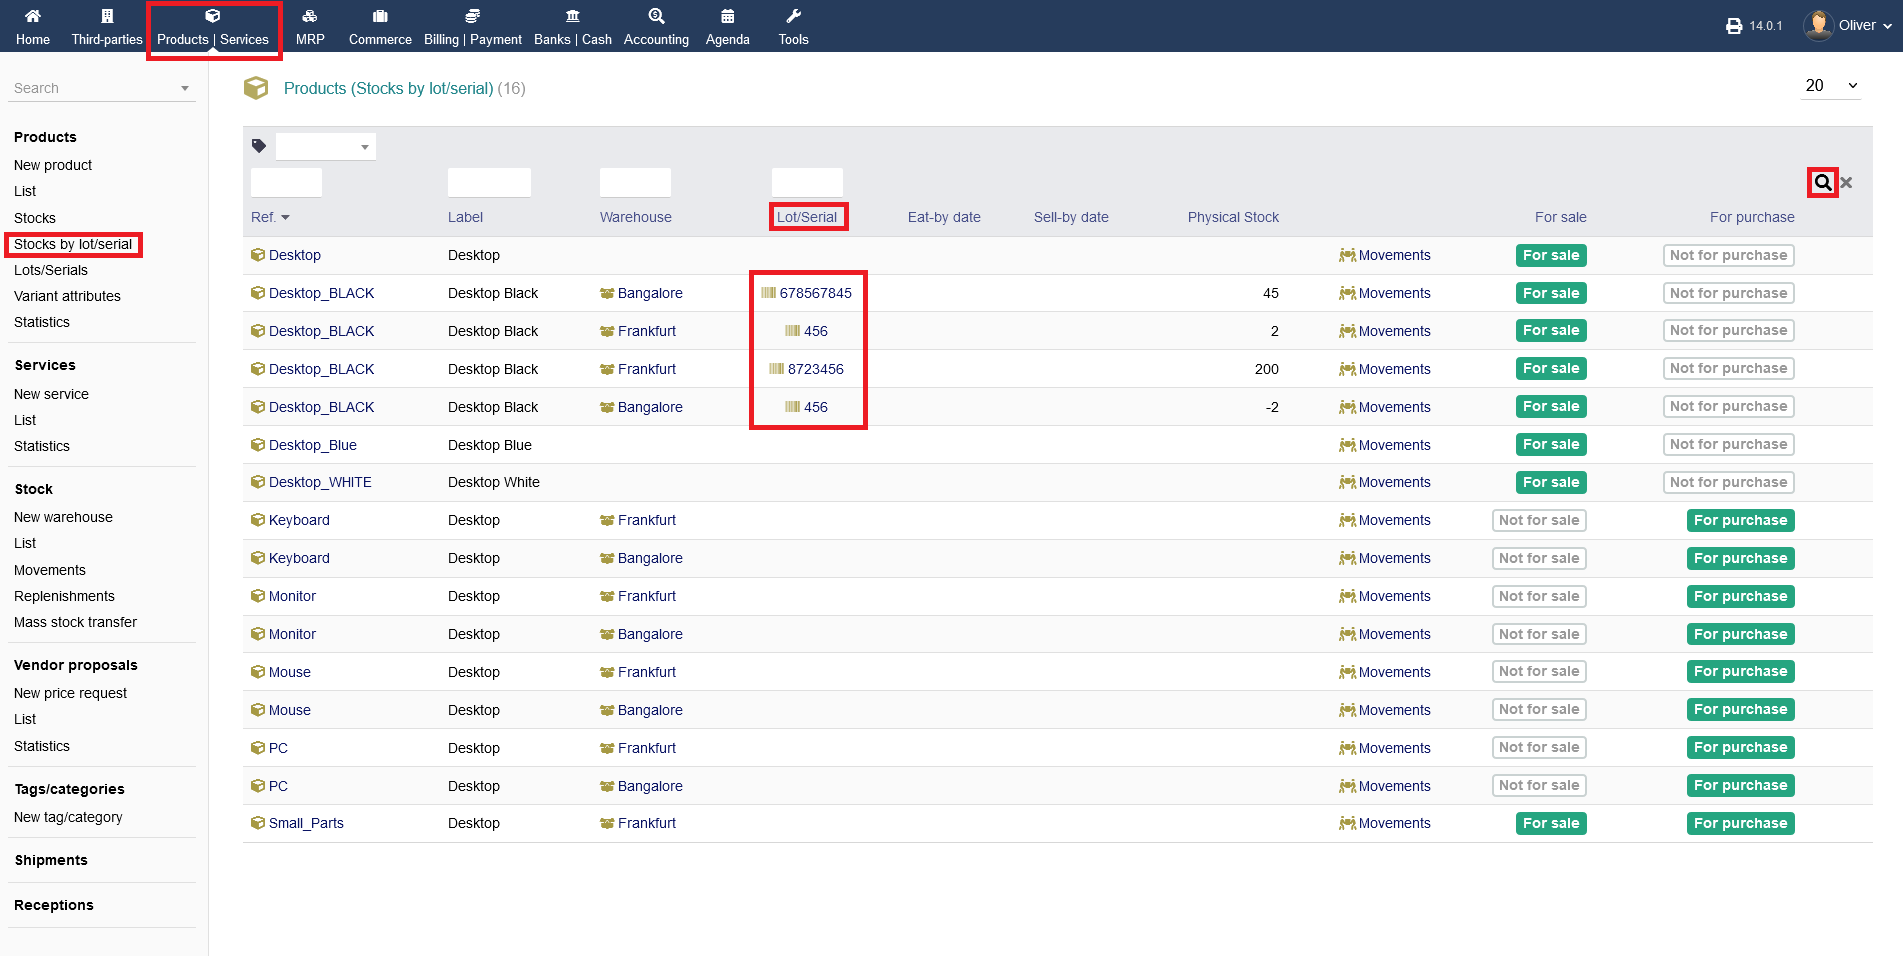
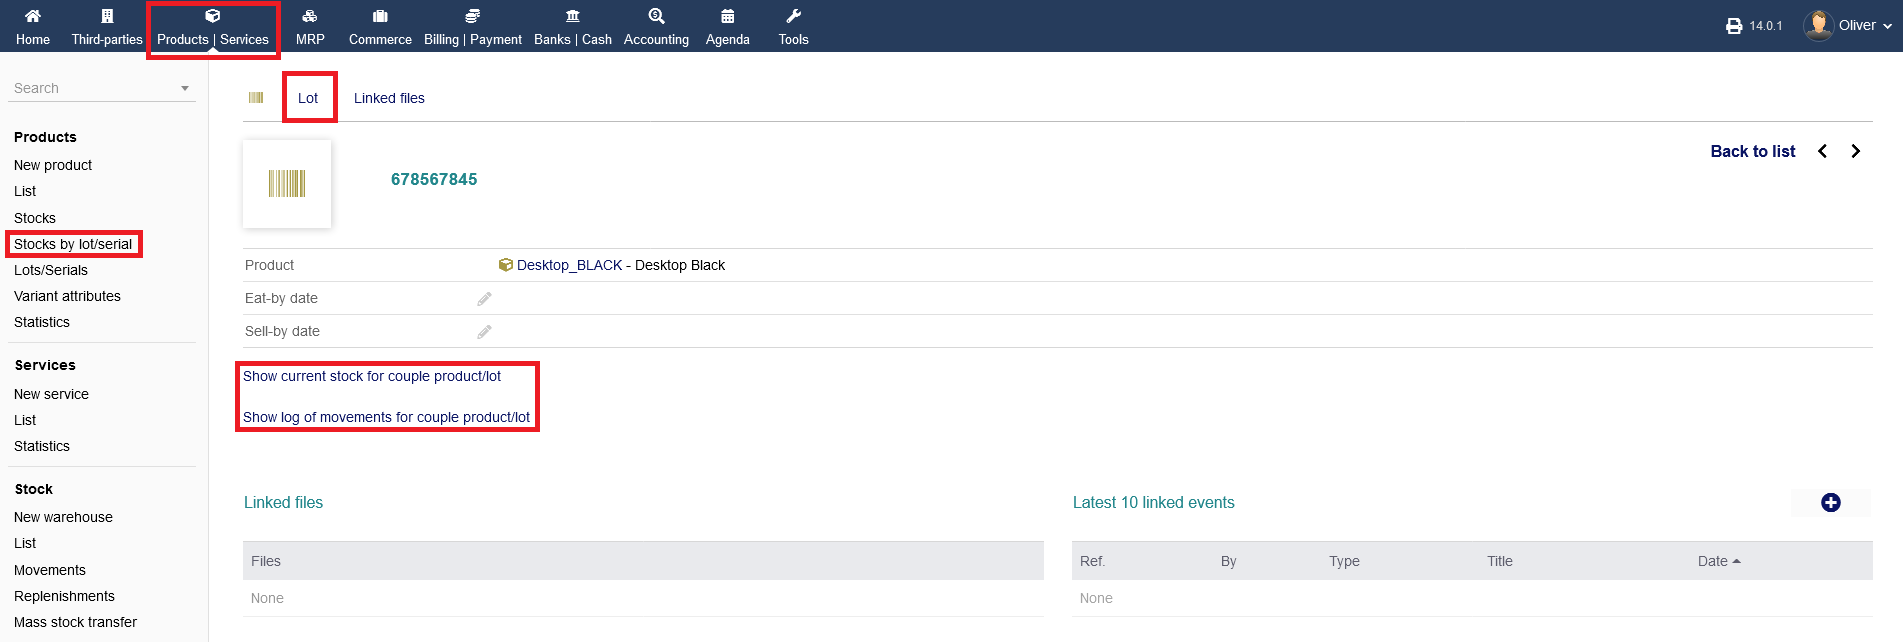
Lots or serial numbers are particularly helpful to identify a product or service. To get an overview of your stock by lot/serial number, click on "Products/Services -> Products -> Stocks by lot/serial". You can sort/filter the view using different parameters of your choice on the top of the listing. Click the "magnifier" icon to filter the listing according your set parameters. This overview shows all products/services whether they have a lot/serial number or not. Under the section "Lot/Serial" you see your lot/serial number. You can get further options by clicking on the lot/serial number itself.
In the lot/serial overview, you can change its details by clicking on the "pen" icons, see any linked files under the section "Linked files" and have an overview of the latest 10 events under the section "Latest 10 linked events". To add an event manually, click the "plus" icon on the right side, fill out all necessary event details in the upcoming form and click "ADD" in the end.
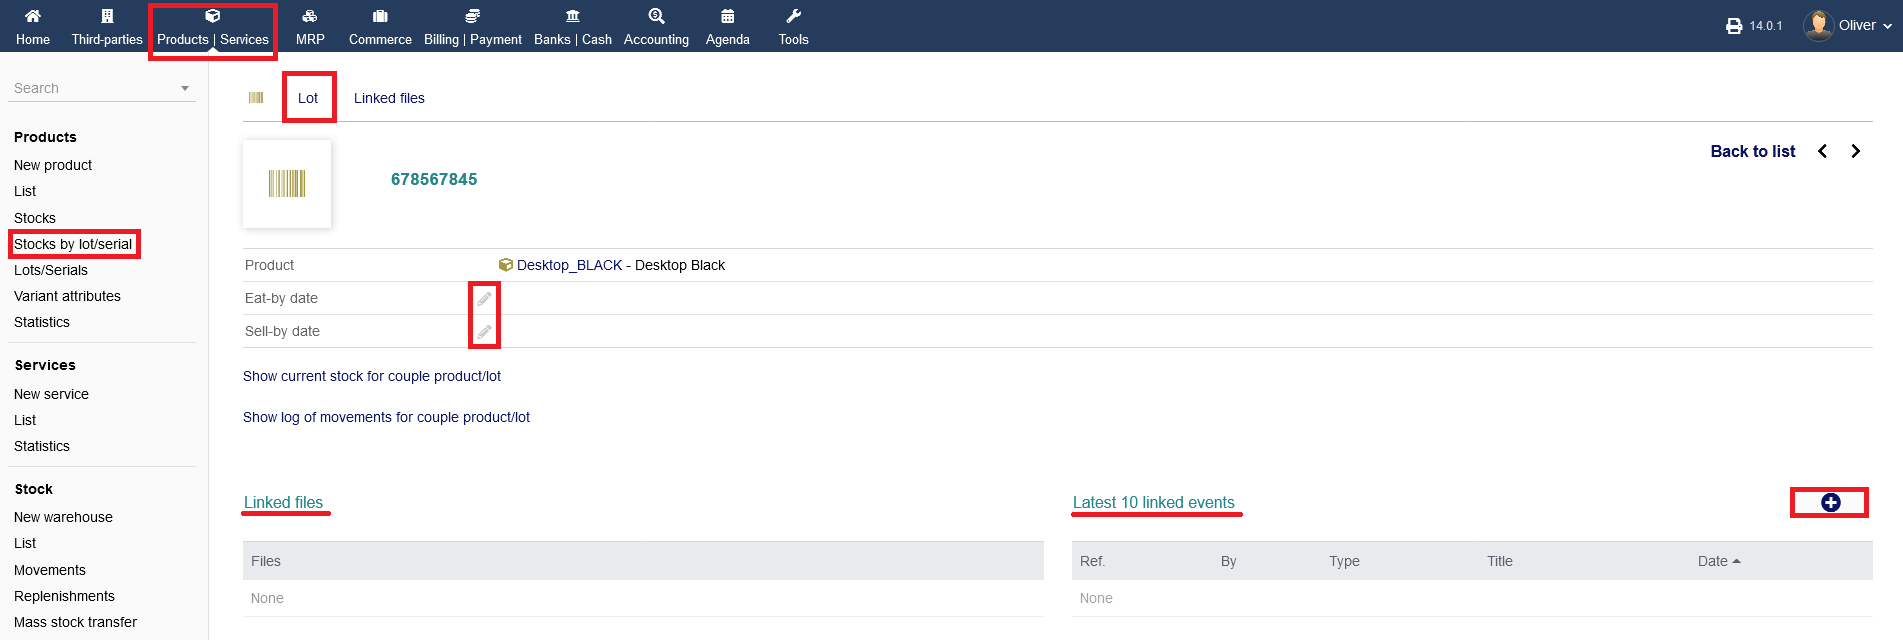
You have two more unique options on the menu tab "Lot". Click on "Show current stock for couple product/lot" to view the current stock for any products/services with that particular lot/serial number. Click "Show log of movements for couple product/lot" to have an overview of all the movements of any products/services with that particular lot/serial number. In both view models, you have the usual filtering option on the top of the listing.
The menu tab "Linked files" follows the same structure as described multiple time before (see previously articles).
Click on "Products/Services -> Products -> Lots/Serials" to get overview only of products/services that have a lot/serial number. Clicking on the product name directs you to the product details (see previously) and clicking on the lot/serial number directs you to the lot/serial details (see above). To add a lot/serial number to a product, click the "plus" icon and choose a product from the respective drop down menu and give it a number in the field below.
